Are you sure you want to delete this task? Once this task is deleted, it cannot be recovered.
You can not select more than 25 topics
Topics must start with a chinese character,a letter or number, can include dashes ('-') and can be up to 35 characters long.
 DimWalker
4a80adc434
DimWalker
4a80adc434
|
1 year ago | |
|---|---|---|
| onnx_v1 | 1 year ago | |
| vx_images | 1 year ago | |
| vx_notebook | 1 year ago | |
| .gitignore | 1 year ago | |
| ForAiStudio.md | 1 year ago | |
| ForHorizon.md | 1 year ago | |
| LICENSE | 1 year ago | |
| README.md | 1 year ago | |
| vx.json | 1 year ago | |
README.md
【AI达人创造营三期】在地平线X3上部署车牌识别系统
一、 项目介绍
本项目属于AI达人创造营三期项目,主要探索如何将PaddleOCR训练的车牌识别模型部署在地平线X3的板子上,并实现实时推理。
项目地址:https://aistudio.baidu.com/aistudio/projectdetail/4730476
二、技术要点
PaddlePaddle之于Arm对应的平台为paddle-lite。paddle-lite主要为c语言,开发及部署难度较大,虽然支持fpga、npu计算加速,但是并不支持本次项目所用到的地平线X3的bpu。
故为实现本项目,需要将paddleocr -> onnx -> onnx bpu的转换路线。
三、项目展示
四、实现教程
本项目涉及的技术栈非常的多,且越往后越难,笔者已实现在地平线使用CPU的推理,但FPS只有1帧。BPU方面虽然转换模型成功了,并貌似实现能推理。但是笔者能力有限和精力有限,并不清楚BPU的推理结果如何转换为可视化结果。
最终并未如笔者所期望,实现完整BPU加速程序。
接下来,笔者将会步步拆解,从易到难(到自己也不懂),还原实现过程。
一)amd64/arm CPU推理篇
本篇主要介绍如何将PaddleOCR模型转换为ONNX模型,转化后的模型均可直接部署于PC和板子上。
- PaddleOCR模型训练
读者可以从此项目 基于PaddleOCR实现的车牌识别 中,获取车牌识别所需的数据集、训练教程,以及hubserving的部署。该教程产出的文本检测及文字识别模型,均为1 eporch,读者可继续优化,本篇不再复述。 - PaddleOCR转ONNX
PaddleOCR已提供一个非常完整的转换教程,见PaddleOCR内的教程 paddle2onnx。
如果是体验arm的cpu,读者完全可以按官方教程,转换上面两个模型即可。后面的bpu部分则需要修改一些参数,才能正常转换为onnx bpu,详见后续说明。 - 推理代码
PaddleOCR官方教程虽然提供了转换教程,但是它展示时用的推理代码,与paddlepaddle耦合在一起,无法直接使用在arm上。正当笔者头痛是要将predict_system.py代码重构,还是走回paddle-lite的老路时,使用了面向百度编程的大招,找到了全网唯一一篇paddleocr转onnx后的推理代码,见 PaddleOCR转ONNX模型(推理部分)。
值得注意,favorxin大佬的代码可能是有点旧,会将rec时的图片resize[3, 32, 100],会导致精度有所损失。本篇教程所用的模型,训练时shape为[3, 48, 320],读者可自行修改。
至此,几乎不用自己写代码,就已完成大部分工作量,可用于pc、arm环境的demo,前期非常幸运(再次剧透,后期比较痛苦)。 - 完整程序代码
因为增加了摄像头的功能,需读者自行下载data文件夹内的onnx_v1.zip到你本地运行。
unzip onnx_v1.zip
cd /home/aistudio/onnx_v1
pip install -r requirements.txt
# 0是摄像头的索引,不填时默认为0
python3 main.py 0
# PS: 按q退出,按空格暂停
实际上除了paddle2onnx的模型转换可以在ai studio上执行,其他代码都无法运行
二)地平线X3硬件篇
本篇开篇前,想吐槽一下笔者本次项目的霉运体质。
第一块的板子是Edgeboard,据助教说板子只支持1.8.5的模型,跟着PaddleOCR上的lite教程跑了一遍,果然不行,编译不了。
第二块板子是地平线X3,跟着教程刷机失败,接着让国晟大佬远程帮忙看看咋回事,确定板子是坏的……
第三块也是X3,终于正常了,刷机一气呵成。
- 前置准备
得先说明一下,官方各资源下载点,并不是很统一,得自己仔细寻找,多逛论坛。
如果只想简单体验,到onnx cpu部署的篇章即可,下载百度网盘的资源包。
如果想尝试BPU开发,需下载20G+的Docker镜像和工具包。
以下是本次项目需用到各种软件:- MobaXterm,一个非常强大的串口/vnc工具。
- 进入地平线官方资源中心
- 串口驱动,3个
藏在天工开物的工具包中,这个包6G+……建议从百度网盘里下载。 - SD卡烧录工具 balenaEtcher

- EMMC烧录工具hbupdate
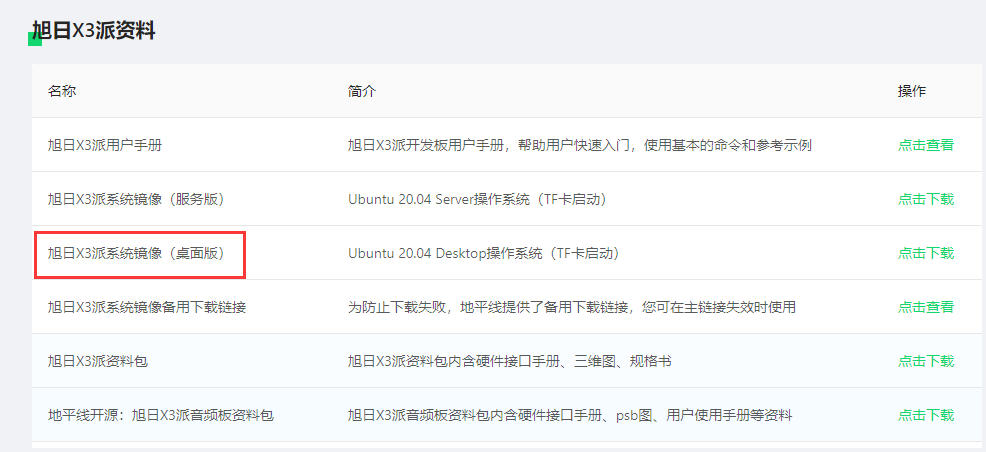
同样藏在天工开物的工具包中。 - 旭日X3派系统镜像(桌面版)(内含EMMC Rom)
- X3SDB Ubuntu 系统镜像(这个没Desktop,和上面的二选一即可)
- 串口驱动,3个
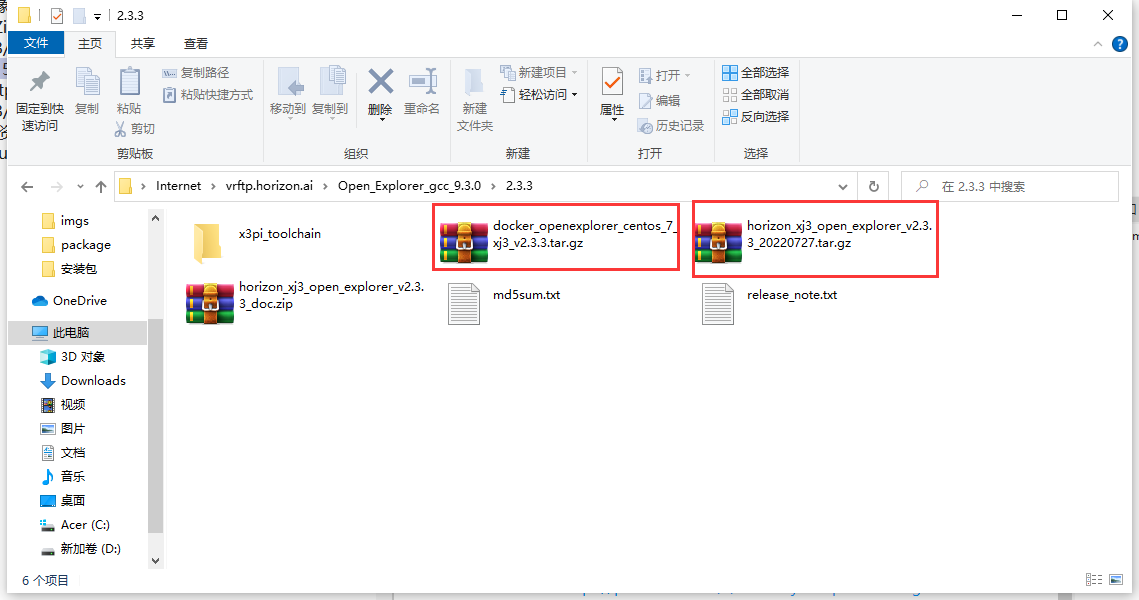
- 天工开物工具包,使用FileZilla匿名打开地址 ftp://vrftp.horizon.ai/Open_Explorer_gcc_9.3.0/2.3.3/
- Docker交叉编译镜像,15G
- 天工开物工具包,6G
- 另一大佬准备好的百度网盘资源包 ,作用基本同上
- 链接:https://pan.baidu.com/s/1e8UISrjka2rqns21uv7tQg
- 提取码:mfz5
- 烧录系统
- 安装3个usb转串口驱动,重启

- 烧录EMMC
有三种方式可以烧录EMMC,分别为网络、Micro Usb,串口。当板子变砖头了,则需要使用串口方式,本篇以此为例。
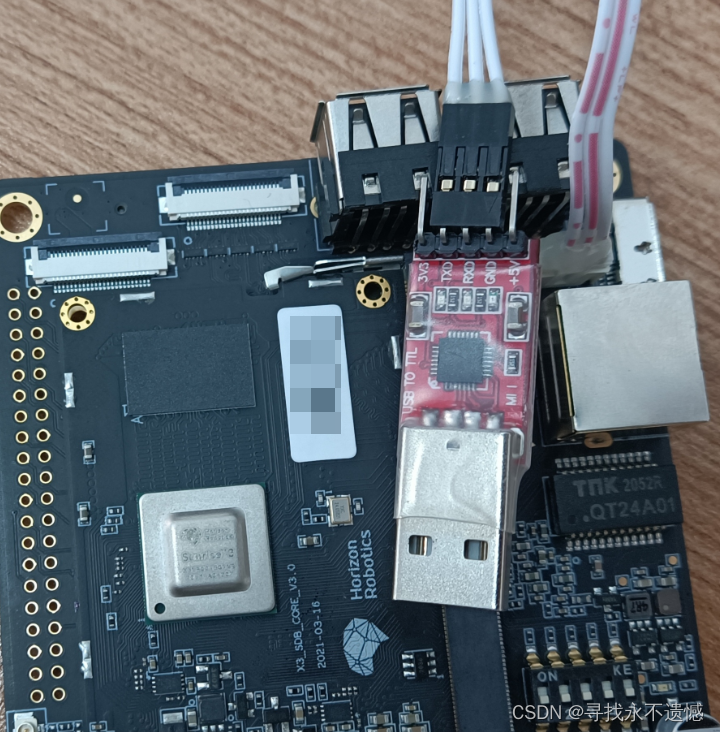
如下图接好串口转Usb线。
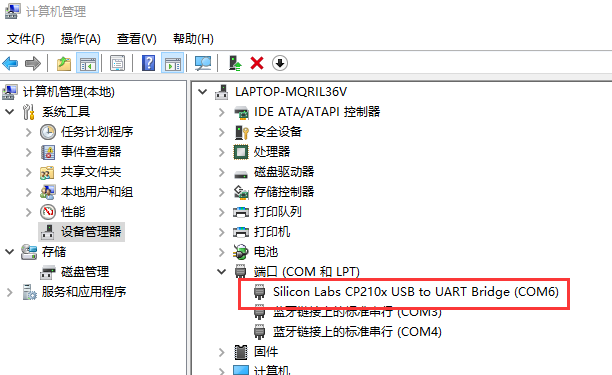
如果驱动、数据线均无问题,会在设备管理器中看到设备COM口。
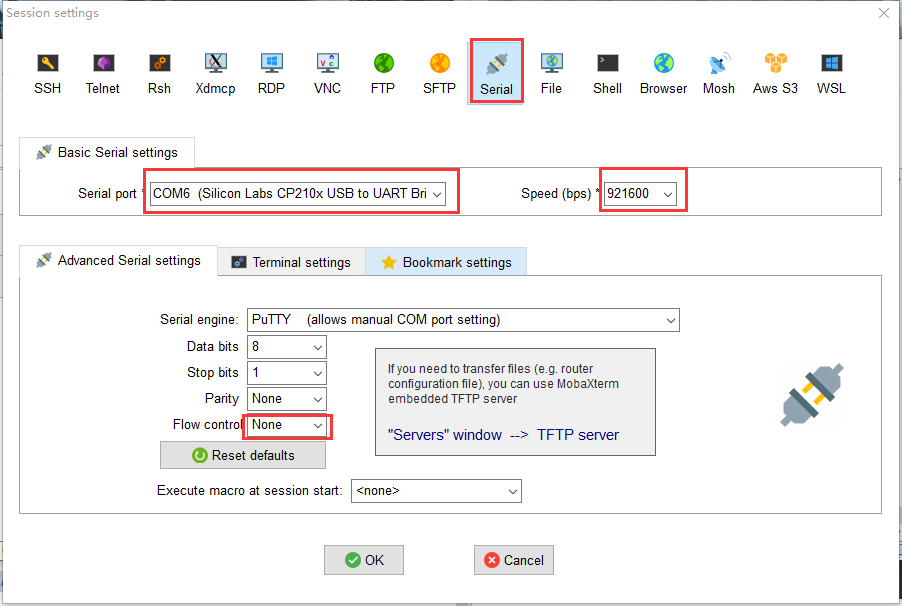
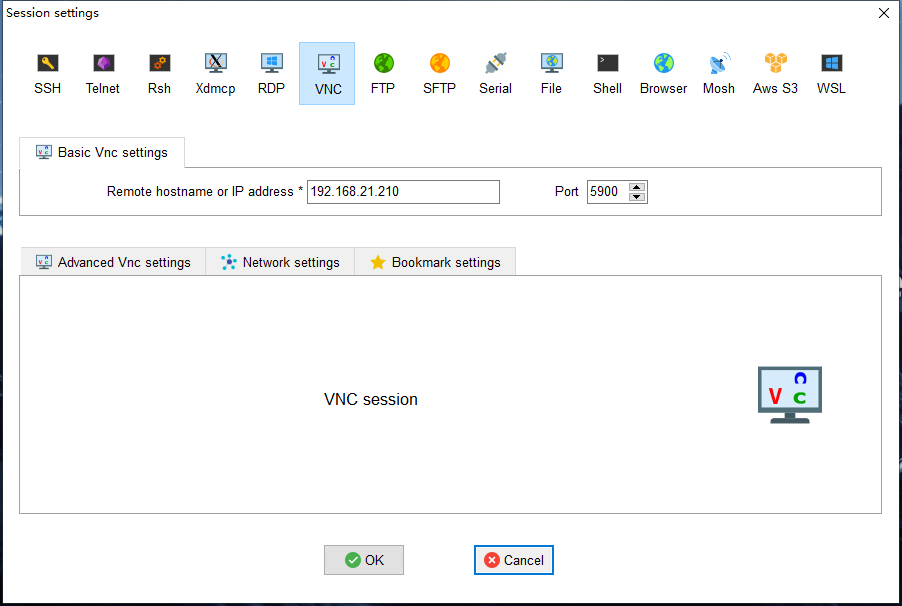
- 打开MobaXterm,点击Session -> Serial,设置端口号,波特率921600,Flow control None,保存后双击打开。
打开Session后,接上电源(如果接了就拔掉重接),此时会看串口输出系统开机信息。
如果你已经装好了系统,最后会显示linux的命令行登录窗口。
关闭Session,准备烧录EMMC。 - EMMC Rom和SD卡系统的选择
由于一些历史原因,笔者刷机刷了x3 sdb emmc + x3 pi Ubuntu desktop。读者也可尝试x3 pi 的emmc,省点下载时间。

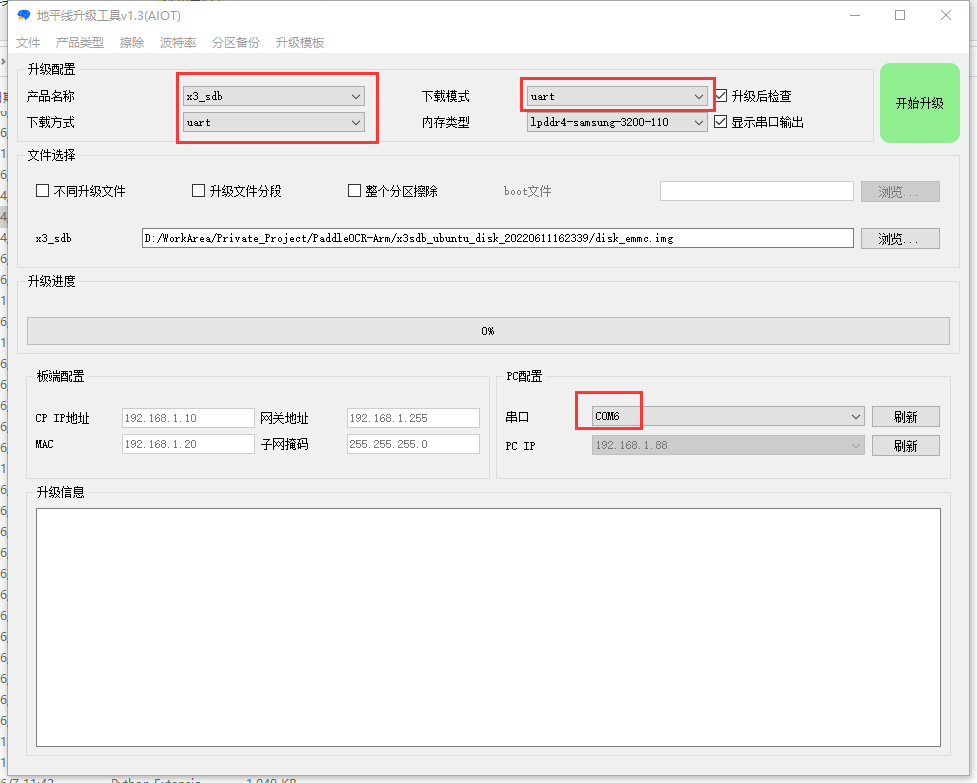
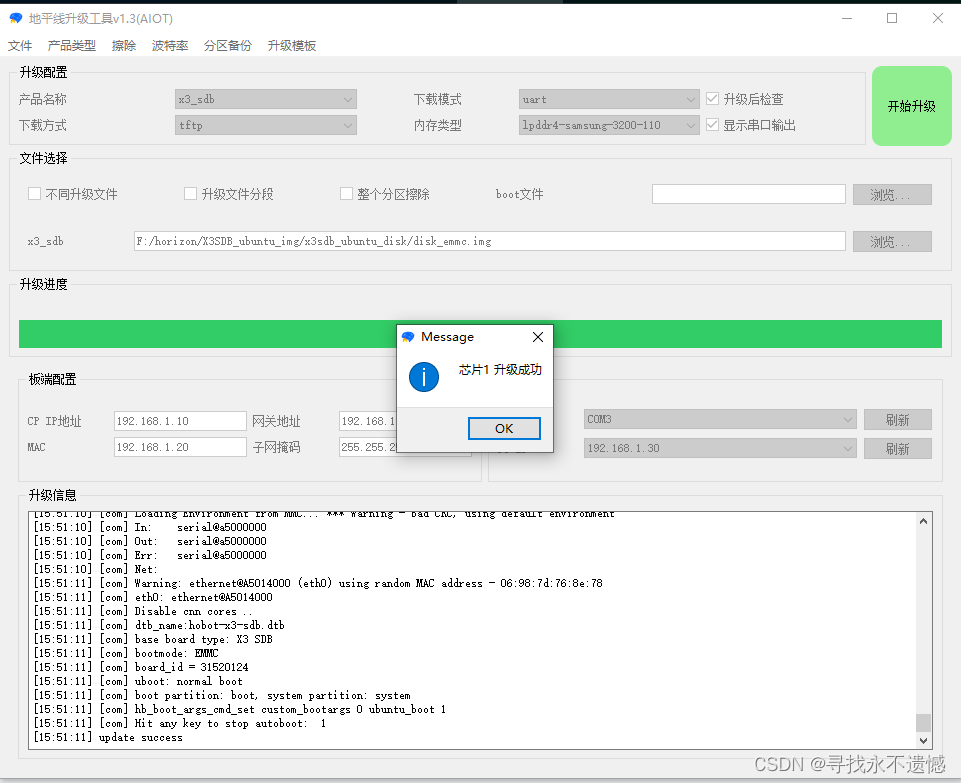
- 打开hbupdate,按下面红框修改设置,设好后点击开始升级。
升级时,首先会提示你拔掉电源,拔掉后点击确定,会继续提示接上电源,接上后按确定即可。如无意外,几分钟后会提示安装成功。
- 烧录SD卡
此时你需要一张SD卡及读卡器。
打开balenaEtcher.exe,选择x3 pi 镜像及SD,点击Flash。

- 安装3个usb转串口驱动,重启
- 登录系统
烧录完毕后,拔掉板子电源,插入SD,再次打开MoboXterm,接上电源,输入账号密码root/root。

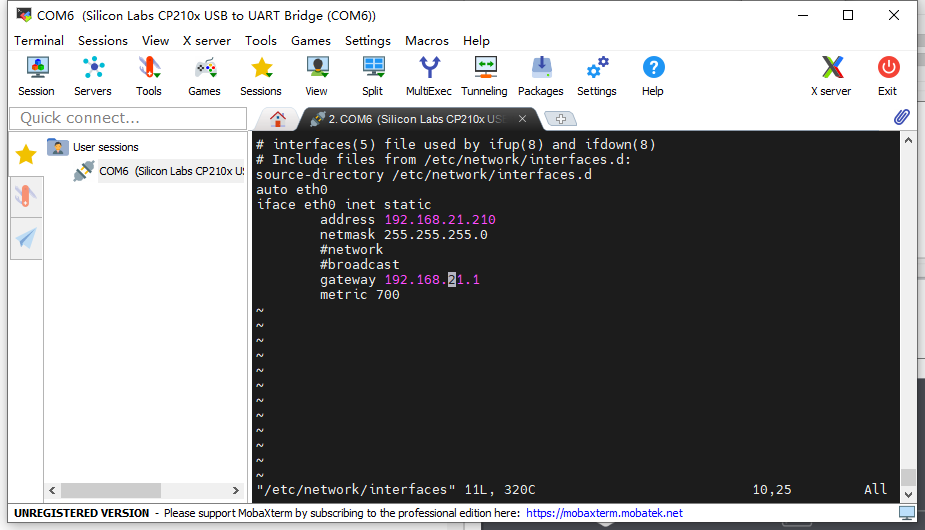
- 修改静态IP
此时默认IP是192.168.1.10,可以按此方式修改IP。
- 修改静态IP
# 修改设置文件
vim /etc/network/interfaces
# 保存后重启网络
/etc/init.d/networking restart
* 安装vnc(可选)
安装命令如下
# a安装软件包
apt install x11vnc
# 设置密码
# 设置后会有一个保存路径,如果读者用的不是root账号,下面脚本内容要相应修改。
x11vnc -storepasswd
# 创建开机服务
vim /lib/systemd/system/x11vnc.service
开机脚本
[Unit]
Description=Start x11vnc at startup.
After=multi-user.target
[Service]
Type=simple
ExecStart=/usr/bin/x11vnc -auth guess -forever -loop -capslock -nomodtweak -noxdamage -repeat -rfbauth /root/.vnc/passwd -rfbport 5900 -shared
[Install]
WantedBy=multi-user.target
启动服务
systemctl daemon-reload
systemctl enable x11vnc.service
systemctl start x11vnc.service
systemctl status x11vnc.service
操作完毕后,继续使用MOBAXterm,新建Session -> VNC
端口在开机脚本中,要一致。
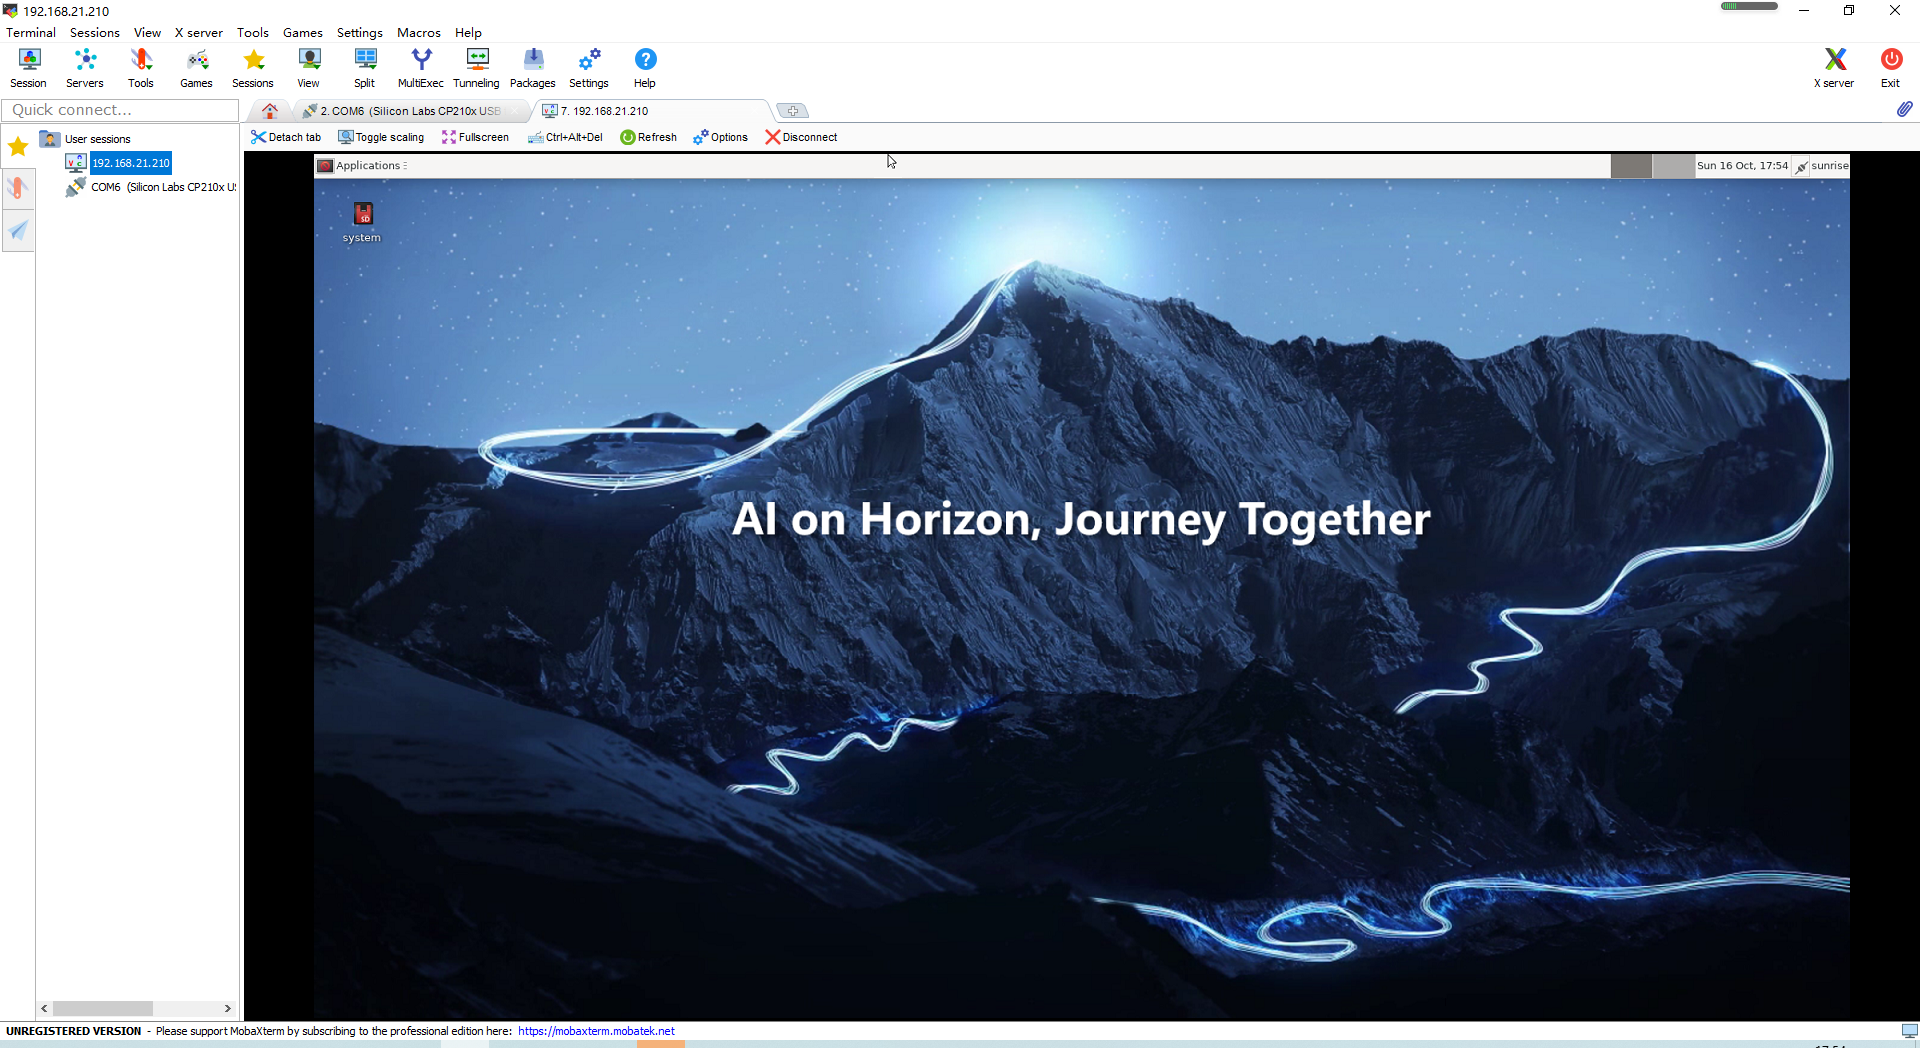
需要注意,桌面的默认登录账号密码为sunrise/sunrise。
故,在这里输入某些命令,是需要加sudo的,不要和上面串口的root账号搞混。
三)ONNX实机测试
笔者以下命令是通过vnc打开板子里的终端操作的,不是串口。
先使用FileZilla上传onnx_v1的代码。
笔者用的是usb 摄像头,使用以下命令查找摄像头。
# 这里会有很多个设备,如果不确定是哪个,先拔掉输入一次命令,再插入输入一次
ls /dev/video*
# 改为你上传的路径
cd /home/sunrise/LPR/onnx_v1/ppocr_onnx
# 改为你的摄像头索引
python3 main.py 8
至此笔者能完整运行的部分,已说明完毕。
下面的BPU篇,笔者能力有限,并未实现一个完整的落地方案。
四)BPU加速推理篇
先重新说明一下转换路线,paddleocr -> onnx -> onnx bpu。
onnx转onnx bpu需要在天工开物的docker交叉编译环境中进行。
首先,强烈建议你读完这两篇文章中的bpu模型转换部分再来操作,否则可能会有点一头雾水。
[BPU部署教程] 一文带你轻松走出模型部署新手村
[BPU部署教程] 教你搞定YOLOV5部署 (版本_ 6.2)
在这两篇文章中,你需要搞懂:
- 如何用docker搭建交叉编译环境。
下面是笔者的命令。
# 笔者用的是Ubuntu虚拟机里运行docker,和上面文章里的不要一样
# 第一个-v参数,为了方便上传文件到宿主后,不用再复制进docker容器
# 第二个-v参数,是天工开物工具包的文件路径
sudo docker run -it --rm \
-v /home/walker/horizon:/horizon \
-v /home/walker/horizon/horizon_xj3_open_explorer_v2.3.3_20220727:/open_explorer \
hub.hobot.cc/aitools/ai_toolchain_centos_7_xj3:v2.3.3
- bpu转换模型中yaml配置文件里的参数含义。
下面是笔者的det和rec的yaml文件,参数含义放在后续结合实例再说。。
# convert_det.yaml
model_parameters:
  onnx_model: 'model.onnx'
  output_model_file_prefix: 'model'
  march: 'bernoulli2'
input_parameters:
  input_type_train: 'bgr'
  input_layout_train: 'NCHW'
  input_type_rt: 'nv12'
  norm_type: 'data_scale'
  scale_value: 0.003921568627451
  input_layout_rt: 'NCHW'
calibration_parameters:
  cal_data_dir: './calibration_data'
  calibration_type: 'max'
  max_percentile: 0.9999
compiler_parameters:
  compile_mode: 'latency'
  optimize_level: 'O3'
  debug: False
  core_num: 2
# convert_rec.yaml
model_parameters:
  onnx_model: 'model.onnx'
  output_model_file_prefix: 'model'
  march: 'bernoulli2'
input_parameters:
  input_type_train: 'bgr'
  input_layout_train: 'NCHW'
  input_type_rt: 'nv12'
  norm_type: 'data_scale'
  scale_value: 0.003921568627451
  input_layout_rt: 'NCHW'
calibration_parameters:
  cal_data_dir: './calibration_data'
  calibration_type: 'max'
  max_percentile: 0.9999
compiler_parameters:
  compile_mode: 'latency'
  optimize_level: 'O3'
  debug: False
  core_num: 2
其次,你需要重新回顾paddle2onnx的内容。因为paddleocr的例子,输入的sharp是动态的,需要将sharp修改为静态。
❗以下命令在paddlepaddle的环境里执行。
# 转化det模型
paddle2onnx --model_dir ./det/LPR_db_mv3_det/inference ^
--model_filename inference.pdmodel ^
--params_filename inference.pdiparams ^
--save_file ./det/LPR_db_mv3_det/det_onnx/model.onnx ^
--opset_version 10 ^
--input_shape_dict="{'x':[1,3,480,640]}" ^
--enable_onnx_checker True ^
--enable_dev_version False
# 转化rec模型
paddle2onnx --model_dir ./rec/LPR_svtr_mv1e_rec/inference ^
--model_filename inference.pdmodel ^
--params_filename inference.pdiparams ^
--save_file ./rec/LPR_svtr_mv1e_rec/rec_onnx/model.onnx ^
--opset_version 10 ^
--input_shape_dict="{'x':[1,3,48,320]}" ^
--enable_onnx_checker True ^
--enable_dev_version False
按PaddleOCR官方说明,改为静态精度会有所降低。
一些说明:
- 不同版本的paddle2onnx中,支持的参数不一样,笔者用的是1.0.1
- opset_version,必须小于11,版本过高无法转换为bpu模型。
- det的input_shape_dict
{'x':[1,3,480,640]},对应bpu转换yaml文件的NCHW模式,即{batchsize,颜色,高,宽}。其中高宽是笔者的摄像头分辨率,读者可按实际情况修改。
摄像头分辨率是2K、4K什么的就按比例缩小吧,高清大图不现实,严重影响推理性能。 - det的input_shape_dict
{'x':[1,3,48,320]},这个是v3模型训练时输入的图像大小。
按笔者的理解,这两个sharp估计不会减少转换的精度。
❗以下命令在天工开物的环境操作(docker)执行。
由于笔者没有完整实现,就不放测试代码了,因为比较混乱可能会误导读者。这里以onnx_v1为例。
- 先把onnx_v1上传到docker里的/horizon文件夹
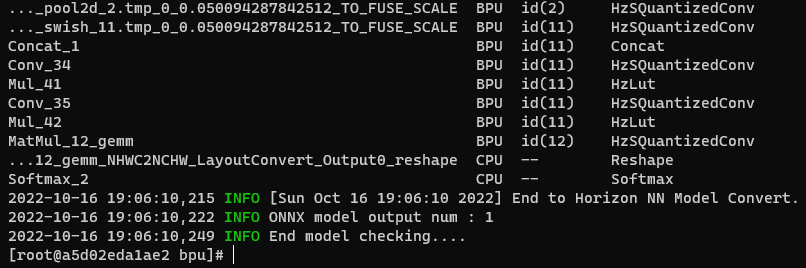
- 检查模型是否支持BPU加速。
# 先cd到output父目录再执行
hb_mapper checker --model-type onnx --march bernoulli2 --model output/det/LPR_db_mv3_det/det_onnx/model.onnx
hb_mapper checker --model-type onnx --march bernoulli2 --model output/rec/LPR_svtr_mv1e_rec/rec_onnx/model.onnx
最后没报错即可。
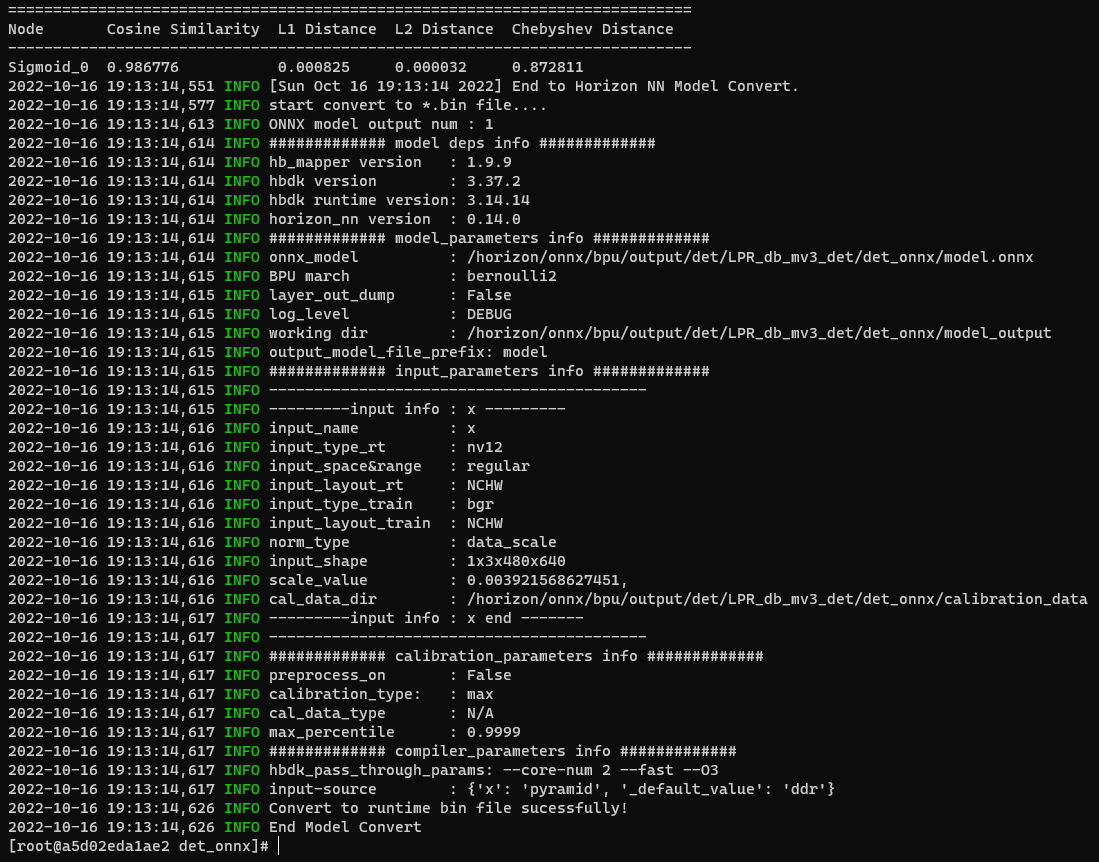
- 转换onnx bpu模型
把上面的yaml文件对应放到det_onnx和rec_onnx里。
det的转换:
# 先cd到det_onnx
hb_mapper makertbin --config convert_det.yaml --model-type onnx
成功转接的截图,bin模型文件会输出在model_output里。
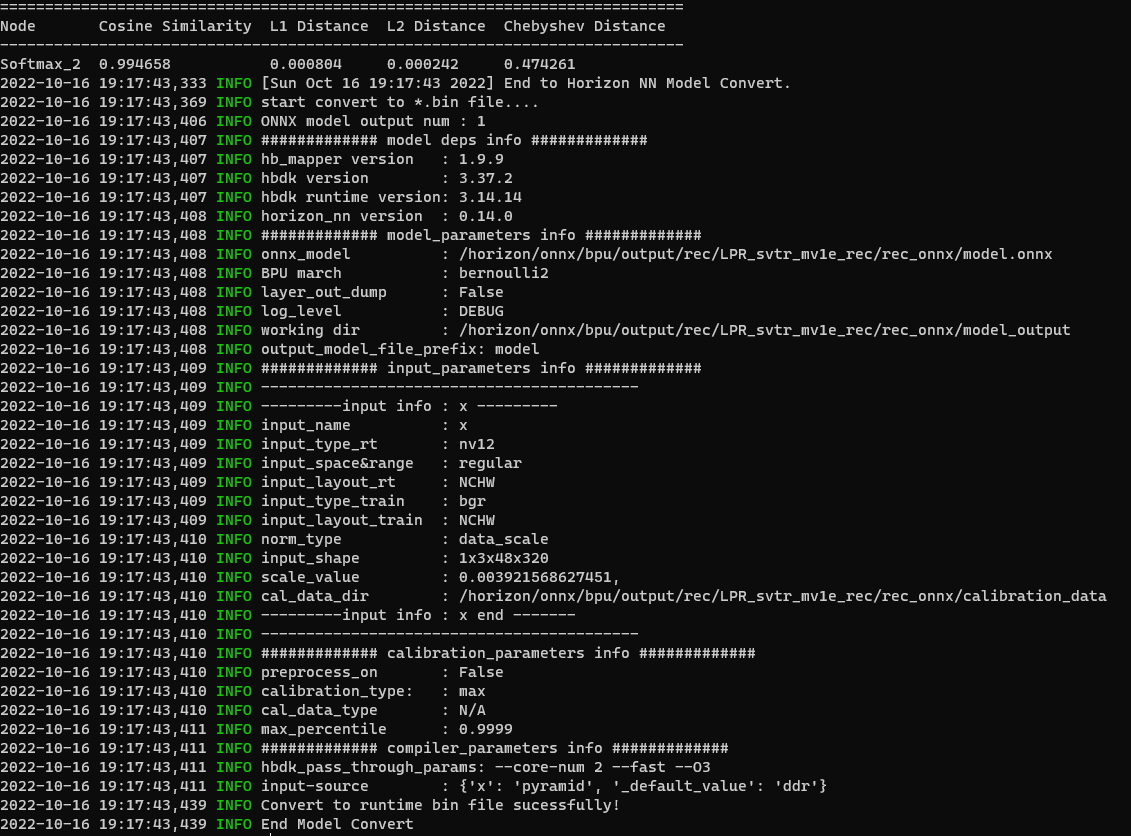
同理rec的转化:
# 先cd到rec_onnx
hb_mapper makertbin --config convert_det.yaml --model-type onnx
截图
❗以下命令在paddlepaddle的环境里执行
- 上板测试
det测试(注意需要sudo权限)
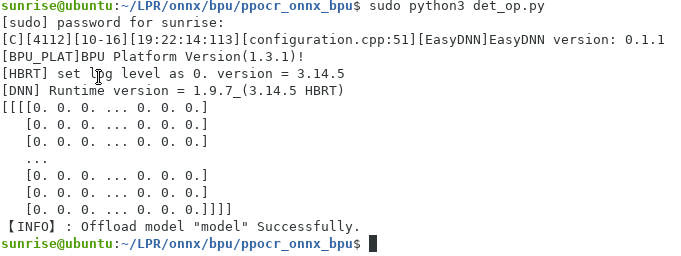
rec测试

虽然无法确定结果正不正确,但从性能方面分析,det≈220ms,rec<100ms,预估性能从cpu的1帧每秒提升到2~3帧每秒吧。
五、结语
对笔者来说,是首次接触arm方面的编程,过程也是一波三折,借了3块板子才做到现在的程度。只可惜最后还是能力有限,没完成后处理部分,略感遗憾。
至于车牌识别这个立项,是笔者毕业那年所在公司的主营业务。当时笔者作为一个新手,并未接触甚至完全不清楚其中用到什么技术。现在能用自己的技术经验,做个技术路线不一样的车牌识别demo出来,也算是人生的一个回顾吧。
【AI达人创造营三期】在地平线X3上部署车牌识别系统
Markdown Python Shell Text other