

Are you sure you want to delete this task? Once this task is deleted, it cannot be recovered.
You can not select more than 25 topics
Topics must start with a chinese character,a letter or number, can include dashes ('-') and can be up to 35 characters long.
 fastalgo
42f044929f
fastalgo
42f044929f
|
3 days ago | |
|---|---|---|
| .github/workflows | 5 days ago | |
| assets | 1 week ago | |
| configs | 1 week ago | |
| docs | 1 week ago | |
| eval | 1 week ago | |
| gradio | 1 week ago | |
| notebooks | 1 week ago | |
| opensora | 1 week ago | |
| scripts | 1 week ago | |
| tests | 1 week ago | |
| tools | 6 days ago | |
| .gitignore | 1 week ago | |
| .isort.cfg | 2 months ago | |
| .pre-commit-config.yaml | 2 months ago | |
| CONTRIBUTING.md | 1 week ago | |
| LICENSE | 1 month ago | |
| README.md | 3 days ago | |
| requirements.txt | 1 week ago | |
| setup.py | 1 week ago | |
README.md
![]()
Open-Sora: Democratizing Efficient Video Production for All
We design and implement Open-Sora, an initiative dedicated to efficiently producing high-quality video. We hope to make the model,
tools and all details accessible to all. By embracing open-source principles,
Open-Sora not only democratizes access to advanced video generation techniques, but also offers a
streamlined and user-friendly platform that simplifies the complexities of video generation.
With Open-Sora, our goal is to foster innovation, creativity, and inclusivity within the field of content creation.
Open-Sora is still at an early stage and under active development.
📰 News
- [2024.04.25] 🤗 We released the Gradio demo for Open-Sora on Hugging Face Spaces.
- [2024.04.25] 🔥 We released Open-Sora 1.1, which supports 2s~15s, 144p to 720p, any aspect ratio text-to-image, text-to-video, image-to-video, video-to-video, infinite time generation. In addition, a full video processing pipeline is released. [checkpoints] [report]
- [2024.03.18] We released Open-Sora 1.0, a fully open-source project for video generation.
Open-Sora 1.0 supports a full pipeline of video data preprocessing, training with

acceleration,
inference, and more. Our model can produce 2s 512x512 videos with only 3 days training. [checkpoints]
[blog] [report] - [2024.03.04] Open-Sora provides training with 46% cost reduction.
[blog]
🎥 Latest Demo
🔥 You can experience Open-Sora on our 🤗 Gradio application on Hugging Face. More samples are available in our Gallery.
| 2s 240×426 | 2s 240×426 |
|---|---|
 |
 |
 |
 |
| 2s 426×240 | 4s 480×854 |
|---|---|
 |
 |
| 16s 320×320 | 16s 224×448 | 2s 426×240 |
|---|---|---|
 |
 |
 |
| <<<<<<< Updated upstream |
=======
Stashed changes
OpenSora 1.0 Demo
| 2s 512×512 | 2s 512×512 | 2s 512×512 |
|---|---|---|
 |
 |
 |
| A serene night scene in a forested area. [...] The video is a time-lapse, capturing the transition from day to night, with the lake and forest serving as a constant backdrop. | A soaring drone footage captures the majestic beauty of a coastal cliff, [...] The water gently laps at the rock base and the greenery that clings to the top of the cliff. | The majestic beauty of a waterfall cascading down a cliff into a serene lake. [...] The camera angle provides a bird's eye view of the waterfall. |
 |
 |
 |
| A bustling city street at night, filled with the glow of car headlights and the ambient light of streetlights. [...] | The vibrant beauty of a sunflower field. The sunflowers are arranged in neat rows, creating a sense of order and symmetry. [...] | A serene underwater scene featuring a sea turtle swimming through a coral reef. The turtle, with its greenish-brown shell [...] |
Videos are downsampled to .gif for display. Click for original videos. Prompts are trimmed for display,
see here for full prompts.
🔆 New Features/Updates
- 📍 Open-Sora 1.1 released. Model weights are available here. It is trained on 0s~15s, 144p to 720p, various aspect ratios videos. See our report 1.1 for more discussions.
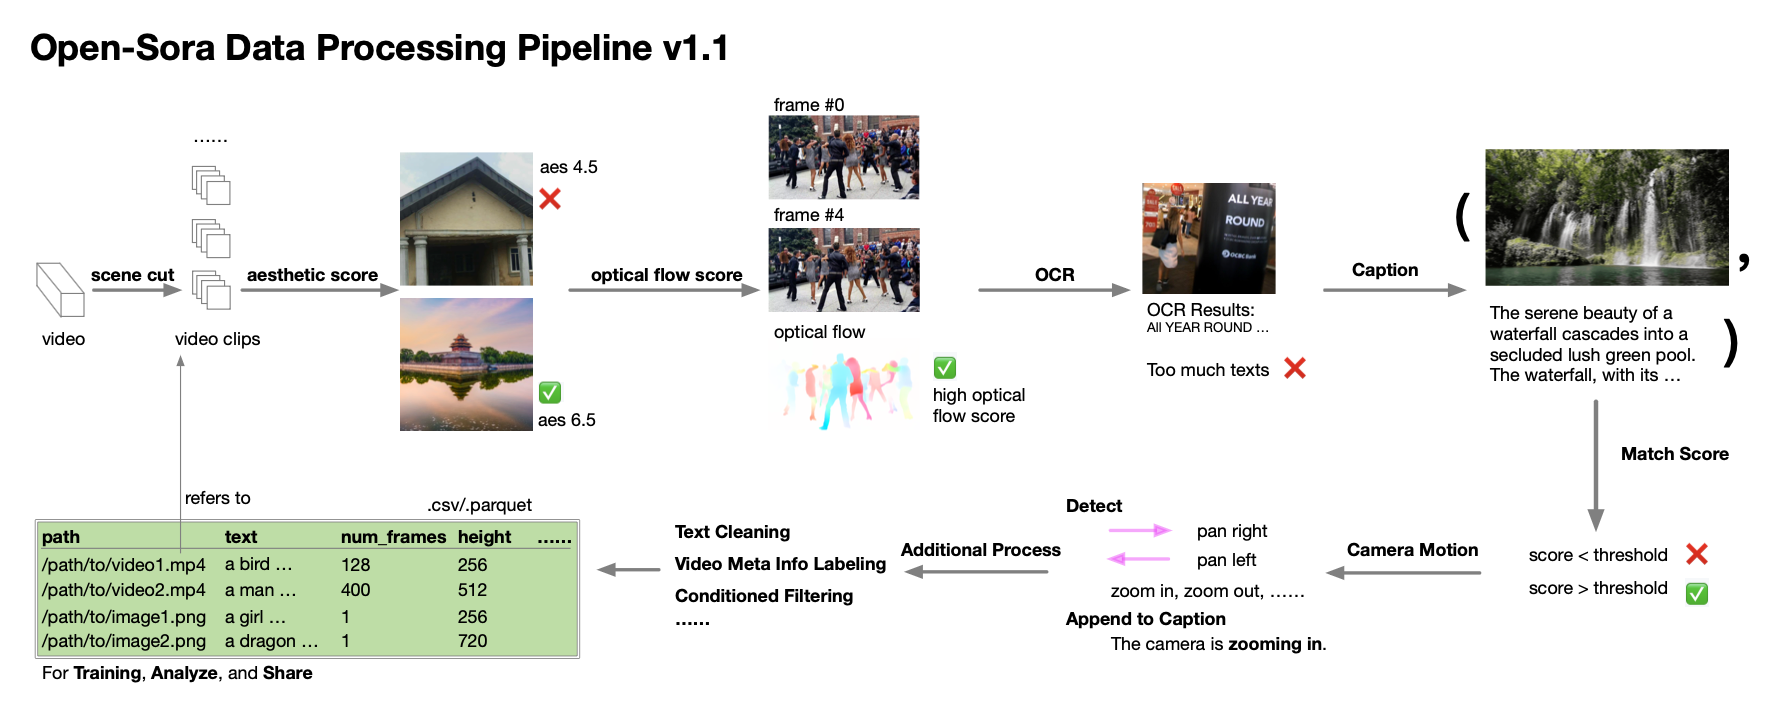
- 🔧 Data processing pipeline v1.1 is released. An automatic processing pipeline from raw videos to (text, video clip) pairs is provided, including scene cutting $\rightarrow$ filtering(aesthetic, optical flow, OCR, etc.) $\rightarrow$ captioning $\rightarrow$ managing. With this tool, you can easily build your video dataset.
- ✅ Improved ST-DiT architecture includes rope positional encoding, qk norm, longer text length, etc.
- ✅ Support training with any resolution, aspect ratio, and duration (including images).
- ✅ Support image and video conditioning and video editing, and thus support animating images, connecting videos, etc.
- 📍 Open-Sora 1.0 released. Model weights are available here. With only 400K video clips and 200 H800
days (compared with 152M samples in Stable Video Diffusion), we are able to generate 2s 512×512 videos. See our report 1.0 for more discussions. - ✅ Three-stage training from an image diffusion model to a video diffusion model. We provide the weights for each
stage. - ✅ Support training acceleration including accelerated transformer, faster T5 and VAE, and sequence parallelism.
Open-Sora improves 55% training speed when training on 64x512x512 videos. Details locates
at acceleration.md. - 🔧 Data preprocessing pipeline v1.0,
including downloading, video cutting,
and captioning tools. Our data collection plan can be found
at datasets.md.
View more
- ✅ We find VQ-VAE from VideoGPT has a low quality and thus adopt a
better VAE from Stability-AI. We also find patching in
the time dimension deteriorates the quality. See our report for more discussions. - ✅ We investigate different architectures including DiT, Latte, and our proposed STDiT. Our STDiT achieves a better
trade-off between quality and speed. See our report for more discussions. - ✅ Support clip and T5 text conditioning.
- ✅ By viewing images as one-frame videos, our project supports training DiT on both images and videos (e.g., ImageNet &
UCF101). See commands.md for more instructions. - ✅ Support inference with official weights
from DiT, Latte,
and PixArt. - ✅ Refactor the codebase. See structure.md to learn the project structure and how to use the
config files.
TODO list sorted by priority
View more
Contents
- Installation
- Model Weights
- Inference
- Data Processing
- Training
- Evaluation
- Contribution
- Acknowledgement
Other useful documents and links are listed below.
- Report: report 1.1, report 1.0, acceleration.md
- Repo structure: structure.md
- Config file explanation: config.md
- Useful commands: commands.md
- Data processing pipeline and dataset: datasets.md
- Each data processing tool's README: dataset conventions and management, scene cutting, scoring, caption
- Evaluation: eval
- Gallery: gallery
Installation
# create a virtual env
conda create -n opensora python=3.10
# activate virtual environment
conda activate opensora

# install torch
# the command below is for CUDA 12.1, choose install commands from
# https://pytorch.org/get-started/locally/ based on your own CUDA version
pip install torch torchvision

# install flash attention (optional)
# set enable_flashattn=False in config to avoid using flash attention
pip install packaging ninja
pip install flash-attn --no-build-isolation

# install apex (optional)
# set enable_layernorm_kernel=False in config to avoid using apex
pip install -v --disable-pip-version-check --no-cache-dir --no-build-isolation --config-settings "--build-option=--cpp_ext" --config-settings "--build-option=--cuda_ext" git+https://github.com/NVIDIA/apex.git

# install xformers
pip install -U xformers --index-url https://download.pytorch.org/whl/cu121

# install this project
git clone https://github.com/hpcaitech/Open-Sora
cd Open-Sora
pip install -v .
Model Weights
Open-Sora 1.1 Model Weights
| Resolution | Model Size | Data | #iterations | Batch Size | URL |
|---|---|---|---|---|---|
| mainly 144p & 240p | 700M | 10M videos + 2M images | 100k | dynamic | :link: |
| 144p to 720p | 700M | 500K HQ videos + 1M images | 4k | dynamic | :link: |
See our report 1.1 for more infomation.
⚠️ LIMITATION: This version contains known issues which we are going to fix in the next version (as we save computation resource for the next release). In addition, the video generation may fail for long duration, and high resolution will have noisy results due to this problem.
Open-Sora 1.0 Model Weights
View more
| Resolution | Model Size | Data | #iterations | Batch Size | GPU days (H800) | URL |
| ---------- | ---------- | ------ | ----------- | ---------- | --------------- |
| 16×512×512 | 700M | 20K HQ | 20k | 2×64 | 35 | :link: |
| 16×256×256 | 700M | 20K HQ | 24k | 8×64 | 45 | :link: |
| 16×256×256 | 700M | 366K | 80k | 8×64 | 117 | :link: |
Training orders: 16x256x256 $\rightarrow$ 16x256x256 HQ $\rightarrow$ 16x512x512 HQ.
Our model's weight is partially initialized from PixArt-α. The number of
parameters is 724M. More information about training can be found in our report. More about
the dataset can be found in datasets.md. HQ means high quality.
⚠️ LIMITATION: Our model is trained on a limited budget. The quality and text alignment is relatively poor.
The model performs badly, especially on generating human beings and cannot follow detailed instructions. We are working
on improving the quality and text alignment.
Inference
Gradio Demo
🔥 You can experience Open-Sora on our 🤗 Gradio application on Hugging Face online.
If you want to deploy gradio locally, we have also provided a Gradio application in this repository, you can use the following the command to start an interactive web application to experience video generation with Open-Sora.
pip install gradio spaces
python gradio/app.py
This will launch a Gradio application on your localhost. If you want to know more about the Gradio applicaiton, you can refer to the README file.
Open-Sora 1.1 Command Line Inference
Since Open-Sora 1.1 supports inference with dynamic input size, you can pass the input size as an argument.
# text to video
python scripts/inference.py configs/opensora-v1-1/inference/sample.py \
    --ckpt-path CKPT_PATH --prompt "A beautiful sunset over the city" --num-frames 32 --image-size 480 854
See here for more instructions including text-to-image, image-to-video, video-to-video, and infinite time generation.
Open-Sora 1.0 Command Line Inference
View more
We have also provided an offline inference script. Run the following commands to generate samples, the required model weights will be automatically downloaded. To change sampling prompts, modify the txt file passed to --prompt-path. See here to customize the configuration.
# Sample 16x512x512 (20s/sample, 100 time steps, 24 GB memory)
torchrun --standalone --nproc_per_node 1 scripts/inference.py configs/opensora/inference/16x512x512.py --ckpt-path OpenSora-v1-HQ-16x512x512.pth --prompt-path ./assets/texts/t2v_samples.txt

# Sample 16x256x256 (5s/sample, 100 time steps, 22 GB memory)
torchrun --standalone --nproc_per_node 1 scripts/inference.py configs/opensora/inference/16x256x256.py --ckpt-path OpenSora-v1-HQ-16x256x256.pth --prompt-path ./assets/texts/t2v_samples.txt

# Sample 64x512x512 (40s/sample, 100 time steps)
torchrun --standalone --nproc_per_node 1 scripts/inference.py configs/opensora/inference/64x512x512.py --ckpt-path ./path/to/your/ckpt.pth --prompt-path ./assets/texts/t2v_samples.txt

# Sample 64x512x512 with sequence parallelism (30s/sample, 100 time steps)
# sequence parallelism is enabled automatically when nproc_per_node is larger than 1
torchrun --standalone --nproc_per_node 2 scripts/inference.py configs/opensora/inference/64x512x512.py --ckpt-path ./path/to/your/ckpt.pth --prompt-path ./assets/texts/t2v_samples.txt
The speed is tested on H800 GPUs. For inference with other models, see here for more instructions.
To lower the memory usage, set a smaller vae.micro_batch_size in the config (slightly lower sampling speed).
Data Processing
High-quality data is crucial for training good generation models.
To this end, we establish a complete pipeline for data processing, which could seamlessly convert raw videos to high-quality video-text pairs.
The pipeline is shown below. For detailed information, please refer to data processing.
Also check out the datasets we use.
Training
Open-Sora 1.1 Training
Once you prepare the data in a csv file, run the following commands to launch training on a single node.
# one node
torchrun --standalone --nproc_per_node 8 scripts/train.py \
    configs/opensora-v1-1/train/stage1.py --data-path YOUR_CSV_PATH --ckpt-path YOUR_PRETRAINED_CKPT
# multiple nodes
colossalai run --nproc_per_node 8 --hostfile hostfile scripts/train.py \
    configs/opensora-v1-1/train/stage1.py --data-path YOUR_CSV_PATH --ckpt-path YOUR_PRETRAINED_CKPT
Open-Sora 1.0 Training
View more
Once you prepare the data in a csv file, run the following commands to launch training on a single node.
# 1 GPU, 16x256x256
torchrun --nnodes=1 --nproc_per_node=1 scripts/train.py configs/opensora/train/16x256x256.py --data-path YOUR_CSV_PATH
# 8 GPUs, 64x512x512
torchrun --nnodes=1 --nproc_per_node=8 scripts/train.py configs/opensora/train/64x512x512.py --data-path YOUR_CSV_PATH --ckpt-path YOUR_PRETRAINED_CKPT
To launch training on multiple nodes, prepare a hostfile according
to ColossalAI, and run the
following commands.
colossalai run --nproc_per_node 8 --hostfile hostfile scripts/train.py configs/opensora/train/64x512x512.py --data-path YOUR_CSV_PATH --ckpt-path YOUR_PRETRAINED_CKPT
For training other models and advanced usage, see here for more instructions.
Evaluation
See here for more instructions.
Contribution
Thanks goes to these wonderful contributors (emoji key
following all-contributors specification):
 zhengzangw 💻 📖 🤔 📹 🚧 |
 ver217 💻 🤔 📖 🐛 |
 FrankLeeeee 💻 🚇 🔧 |
 xyupeng 💻 📖 🎨 |
 Yanjia0 📖 |
 binmakeswell 📖 |
 eltociear 📖 |
 ganeshkrishnan1 📖 |
 fastalgo 📖 |
 powerzbt 📖 |
If you wish to contribute to this project, you can refer to the Contribution Guideline.
Acknowledgement
- ColossalAI: A powerful large model parallel acceleration and optimization
system. - DiT: Scalable Diffusion Models with Transformers.
- OpenDiT: An acceleration for DiT training. We adopt valuable acceleration
strategies for training progress from OpenDiT. - PixArt: An open-source DiT-based text-to-image model.
- Latte: An attempt to efficiently train DiT for video.
- StabilityAI VAE: A powerful image VAE model.
- CLIP: A powerful text-image embedding model.
- T5: A powerful text encoder.
- LLaVA: A powerful image captioning model based on Mistral-7B and Yi-34B.
We are grateful for their exceptional work and generous contribution to open source.
Star History
No Description
Python Text Shell Jupyter Notebook
Contributors (25+)
zangwei@comp.nus.edu.sg
somerlee.9@gmail.com
zhengzangw@gmail.com
lhx0217@gmail.com
99191637+xyupeng@users.noreply.github.com
pexure@gmail.com
68757353+Sze-qq@users.noreply.github.com
42895286+Yanjia0@users.noreply.github.com
binmakeswell@gmail.com
eltociear@gmail.com
e0052680@u.nus.edu
tomyoung903@gmail.com
90625606+1zeryu@users.noreply.github.com
31471452+celaraze@users.noreply.github.com
youyang@cs.berkeley.edu
710720732@qq.com
github@alphasigma.com.au
114094231+jeslinpjames@users.noreply.github.com
50580578+KimbingNg@users.noreply.github.com
julius.han@outlook.com
sarroutb@redhat.com
79297450+sbera7@users.noreply.github.com
36354458+TommyZihao@users.noreply.github.com
32323900+wanng-ide@users.noreply.github.com
35946751+xuhuasheng@users.noreply.github.com