Are you sure you want to delete this task? Once this task is deleted, it cannot be recovered.
You can not select more than 25 topics
Topics must start with a chinese character,a letter or number, can include dashes ('-') and can be up to 35 characters long.
 i-robot
ad04c4ffc3
i-robot
ad04c4ffc3
|
1 year ago | |
|---|---|---|
| .. | ||
| images | 1 year ago | |
| src | 1 year ago | |
| README.md | 1 year ago | |
| car.ipynb | 1 year ago | |
README.md
Contents
- Contents
- Learned Image Downscaling for Upscaling Using Content Adaptive Resampler (CAR)
- Pretrained model
- Datasets link
- How to compile Custom Operators
- Training Parameter description
- Example
- Dataset
- Train Model
- Evaluate Model
- Infer
- Result
Learned Image Downscaling for Upscaling Using Content Adaptive Resampler (CAR)
CAR is an efficient image downscaling and upscaling method to make resources saving by only generating, storing and transmitting a single downscaled version for preview and upscaling it to high resolution when details are going to be viewed. It employed a SR model to try the best to recover HR images while adaptively adjusting the downscaling model to produce LR images.
Pretrained model
Quantitative evaluate result (PSNR / SSIM) of different image downscaling method for SR on benchmar datasets: SET5, SET14, BSD100, URBAN100 AND DIV2K (VALIDATION SET). Model for MindSpore:
| scale | model | Set5 | Set14 | B100 | Urban100 | DIV2K(Val) | ckpt |
| 4x | kernel generator net | 34.17 / 0.9196 | 29.49 / 0.8092 | 30.61 / 0.8427 | 29.31 / 0.8704 | 32.68 / 0.8871 | ckpt |
| super resolution net | ckpt | ||||||
| 2x | kernel generator net | 38.96 / 0.9643 | 35.84 / 0.9394 | 33.88 / 0.9221 | 35.36 / 0.9556 | 37.92 / 0.9583 | ckpt |
| super resolution net | ckpt |
Datasets link
| Dataset | Download link |
|---|---|
| DIV2K_HR(train) | DIV2K_HR |
| DIV2K_HR(val) | DIV2K_HR |
| Set14/Set5/BSD100/Urban100 | Set5 |
How to compile Custom Operators
For GPU
GPU custom operator implement by CUDA language. You need to complie adaptive_gridsampler_cuda.so firstly.
Follow the following commands:
cd $CAR_ROOT/src/plug_in/adaptive_gridsampler
python setup.py
if compile successfully, you can find adaptive_gridsampler_cuda.so in same directory.
For Ascend
Ascend custom operator implement by AICPU.
Follow the following commands to compile library:
First, set the ascend-toolkit environment
. /usr/local/Ascend/ascend-toolkit/set_env.sh
Then, start to compile.
cd $CAR_ROOT/src/plug_in/adaptive_gridsampler_ascend

./build.sh -c
If compile successfully, you can find libcust_aicpu_kernels.so at ./build_out/makepkg/packages/op_impl/custom/cpu/aicpu_kernel/custom_impl
In the end, copy the .so to conda/envs/${your_env}/lib/python3.7/site-packages/mindspore/lib/
$CAR_ROOT is the root directory of the car project. ${your_env} is the conda environment you used.
Training Parameter description
For 4x downsampler
| Parameter | Default | Description |
|---|---|---|
| workers | 1 | Number of parallel workers |
| device_target | GPU | Device type |
| base_lr | 0.0001 | Base learning rate |
| end_epoch | 500 | Number of epoch |
| scale | 4 | Downscaling rate |
| resize | 192 | image size |
| target_dataset | DIV2KHR | Dataset name |
| train_batchsize | 16 | Number of batch size |
| checkpoint_path | ./checkpoint | Path to save checkpoint |
| image_path | ./datasets | Path of training file |
| eval_proid | 1 | The period for evaluating |
| train_repeat_num | 8 | Repeated the training set |
For 2x downsampler
| Parameter | Default | Description |
|---|---|---|
| workers | 1 | Number of parallel workers |
| device_target | GPU | Device type |
| base_lr | 0.0001 | Base learning rate |
| end_epoch | 500 | Number of epoch |
| scale | 2 | Downscaling rate |
| resize | 96 | image size |
| target_dataset | DIV2KHR | Dataset name |
| train_batchsize | 24 | Number of batch size |
| checkpoint_path | ./checkpoint | Path to save checkpoint |
| image_path | ./datasets | Path of training file |
| eval_proid | 1 | The period for evaluating |
| train_repeat_num | 8 | Repeated the training set |
Example
Here, how to use CAR model will be introduce as following.
Dataset
In this work, it employed the DIV2K image dataset for training. So first, you should download the dataset from DIV2K,. Since it focus on how to
downscale images without any supervision, only HR images of the mentioned datasets were utilized.
After you get the dataset, make sure your path is as following:
.datasets/
    └── DIV2K
            ├── DIV2K_train_HR
            |    ├── 0001.png
            |    ├── 0002.png
            |    ├── ...
            ├── DIV2K_valid_HR
            |    ├── 000801.png
            |    ├── 000802.png
            |    ├── ...
Train Model
This work provide 2 different downing scaling rate, 2x and 4x. You can easily to select it by setting training parameter 'scale'. Note that for 4x downscale and the HR image is cropped to 192x192 while for 2x it cropped to 96x96
For 2x down scaling
nohup python -u src/train.py --device_target GPU --device_id 0 --scale 2 --resize 96 --checkpoint_path ./ckpt > train_2x.log 2>&1 &
output:
epoch: 1 step: 397, loss is 0.051505643874406815
epoch: 1 step: 398, loss is 0.04075116664171219
epoch: 1 step: 399, loss is 0.054144758731126785
epoch: 1 step: 400, loss is 0.05374082177877426
Validating...
epoce 1, Save model..., m_psnr for 10 images: 23.438450113273166
Validating Done.
Train epoch time: 649160.400 ms, per step time: 1622.901 ms
For 4x down scaling
nohup python -u src/train.py --device_target GPU --device_id 0 --scale 4 --resize 192 --checkpoint_path ./ckpt > train_4x.log 2>&1 &
output
epoch: 1 step: 397, loss is 0.051505643874406815
epoch: 1 step: 398, loss is 0.04075116664171219
epoch: 1 step: 399, loss is 0.054144758731126785
epoch: 1 step: 400, loss is 0.05374082177877426
Validating...
epoce 1, Save model..., m_psnr for 10 images: 23.438450113273166
Validating Done.
Train epoch time: 649160.400 ms, per step time: 1622.901 ms
After finishing training, the checkpoint file will sava in ${checkpoint_path}/${scale}.
Evaluate Model
In the testing, four standard datasets, i.e., the Set5, Set14, BSD100 and Urban100 were used as suggested by the EDSR paper. You can download from Set5. After unzip the downloaded file, the struct of directory should as follow:
└── datasets
       ├── Set5
       |    ├── baby.png
       |    ├── bird.png
       |    ├── ...
       ├── Set14
       |    ├── baboon.png
       |    ├── barbara.png
       |    ├── ...
       ├── BSDS100
       |    ├── 101085.png
       |    ├── 101087.png
       |    ├── ...
       ├── Urban100
       |    ├── img_001.png
       |    ├── img_002.png
       |    ├── ...
       └── DIV2K
           ├── DIV2K_train_HR
           |    ├── 0001.png
           |    ├── 0002.png
           |    ├── ...
           ├── DIV2K_valid_HR
           |    ├── 000801.png
           |    ├── 000802.png
           |    ├── ...
Then you can execute command as follow:
For 2x down scaling
python src/eval.py --img_dir=./datasets/ --scale=4 --device_target GPU --kgn_ckpt_name ./ckpt/2x/kgn.ckpt --usn_ckpt_name ./ckpt/2x/usn.ckpt --target_dataset Set5 --device_id 0
For 4x down scaling
python src/eval.py --img_dir=./datasets/ --scale=4 --device_target GPU --kgn_ckpt_name ./ckpt/4x/kgn.ckpt --usn_ckpt_name ./ckpt/4x/usn.ckpt --target_dataset Set5 --device_id 0
output:
100%|█████████████████████████████████████████████████████████████████████████████████████████████| 5/5 [00:11<00:00,  2.27s/it]
Mean PSNR: 38.96
Mean SSIM: 0.9643
For evaluate different dataset, you can modify the target_dataset, the supporeted datasets is DIV2KHR/Set5/Set14/BSDS100/Urban100
Infer
At last, you can use your own image to test your model. Put your image in the img_dir folder, then run eval.py to do inference.
Result
| Original image | Downscaling image | Reconstuct image |
|---|---|---|
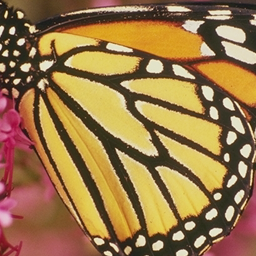 |
 |
 |
MindSpore实验,仅用于教学或培训目的。配合MindSpore官网使用。 MindSpore experiments, for teaching or training purposes only. Use it together with the MindSpore official website.
CSV Jupyter Notebook Text Python Markdown other
Contributors (25+)
huawei_ci_bot@163.com
chenzhongming1@huawei.com
dongyonghan@huawei.com
 yangyaqin1@huawei.com
 zhengnengjin@huawei.com
yuanyujie@huawei.com
314202276@qq.com
xiaokehuang@foxmail.com
jingranxie@gmail.com
zhengnengjin@huawei.com
yuanyujie@huawei.com
314202276@qq.com
xiaokehuang@foxmail.com
jingranxie@gmail.com
 z17853805901@163.com
982457331@qq.com
z17853805901@163.com
982457331@qq.com

 1041634596@qq.com
hhz21@mails.tsinghua.edu.cn
10293547+chen-xiuzhu@user.noreply.gitee.com
chengmin_cui@163.com
weijian940330@gmail.com
yuxincao22@163.com
1067874054@qq.com
15521031278@163.com
liqc21@mails.tsinghua.edu.cn
1041634596@qq.com
hhz21@mails.tsinghua.edu.cn
10293547+chen-xiuzhu@user.noreply.gitee.com
chengmin_cui@163.com
weijian940330@gmail.com
yuxincao22@163.com
1067874054@qq.com
15521031278@163.com
liqc21@mails.tsinghua.edu.cn
yangyaqin1@huawei.com
zhengnengjin@huawei.com
yuanyujie@huawei.com
314202276@qq.com
xiaokehuang@foxmail.com
jingranxie@gmail.com
z17853805901@163.com
982457331@qq.com
1041634596@qq.com
hhz21@mails.tsinghua.edu.cn
10293547+chen-xiuzhu@user.noreply.gitee.com
chengmin_cui@163.com
weijian940330@gmail.com
yuxincao22@163.com
1067874054@qq.com
15521031278@163.com
liqc21@mails.tsinghua.edu.cn