百度AI达人创造营第二期____基于jetsonnano部署的手势乐器___硬件部署部分
关键词:Jetson Nano部署,Arduino,上位机通信代码
百度AI达人创造营第二期____基于jetsonnano部署的手势乐器___模型训练部分
由于训练部分需要使用aistudio平台进行paddle套件的部署,所以我给出aistudio的地址,直接fork便于操作
使用paddledetection在jetson nano上部署目标检测网络,检测简单手势,然后再通过nano控制beep等外设,来达到beep的变频输出,所有部署相关操作流程
以及所需代码都已在下面给出
0.简介
首先感谢百度Paddle为我提供的硬件设备,为每一个梦想插上了翅膀
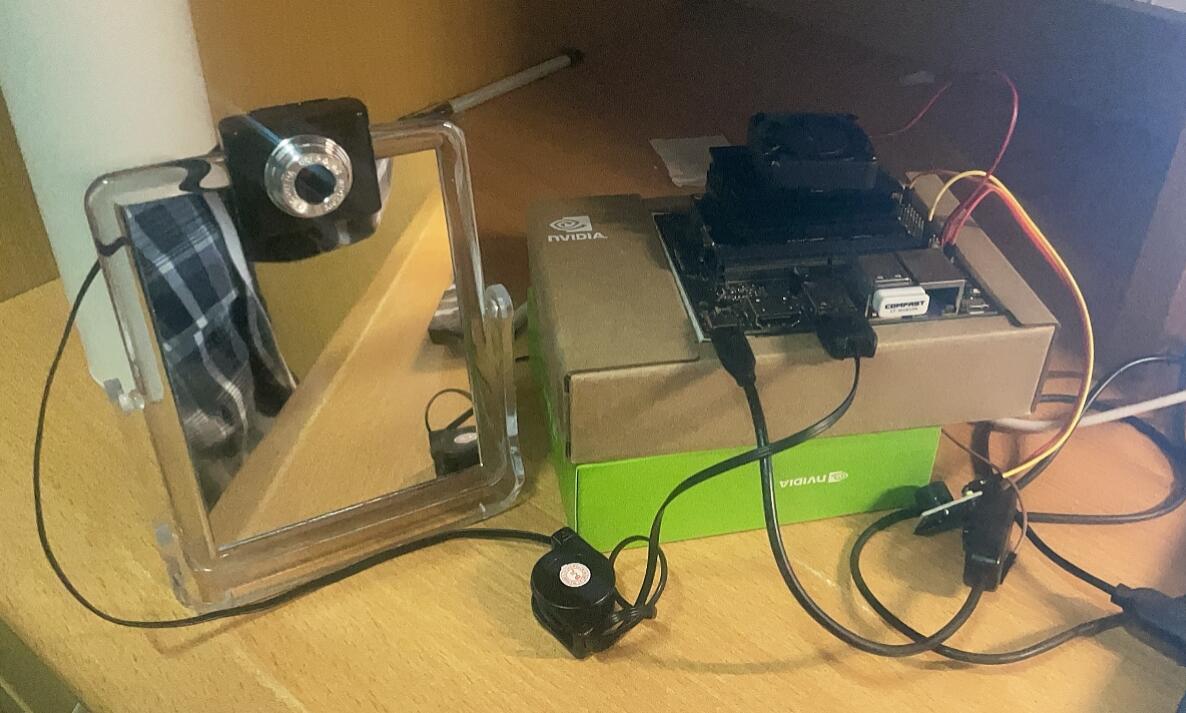
一枚热爱技术的菜鸡,今天想做一个目标检测和嵌入式的结合体,做一个jetson nano乐器
方案:
使用paddledetection训练模型并使用paddleInference在jetson nano上部署目标检测网络,
使用Tensorrt进行Jetsonnano的加速,
达到一个令人满意的FPS,检测简单手势,
然后再通过nano控制beep等外设,来达到beep的变频输出
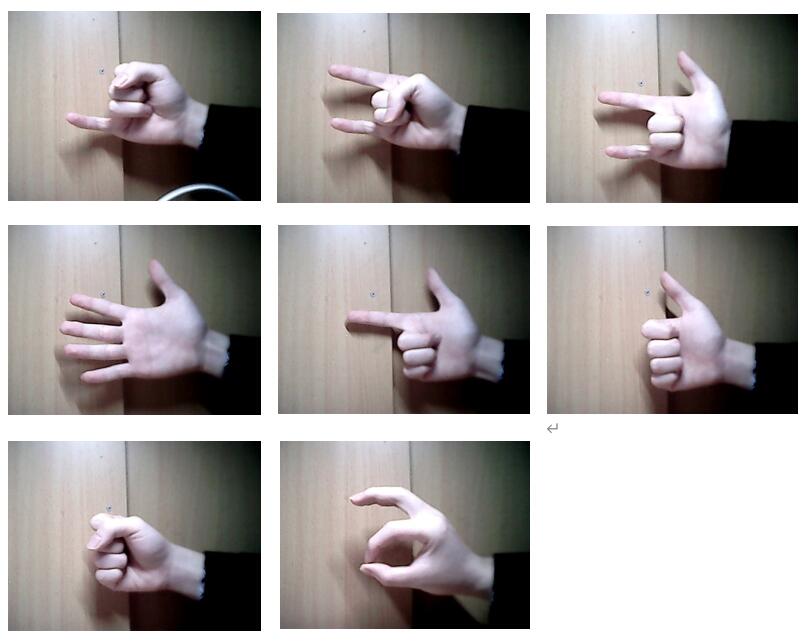
使用7种手势代表7种音阶
do、re、mi、fa、sol、la、si
且为了使得音调更加丰富,我使用了第八种手势,当第八种手势出现在画面中的时候,音阶就会上抬一个八度,于是我们获得了十四个音阶
do、re、mi、fa、sol、la、si、ddo、dre、dmi、dfa、dsol、dla、dsi
从左向右从上往下依次是12 .....最后一个是音阶抬高记号
视频演示
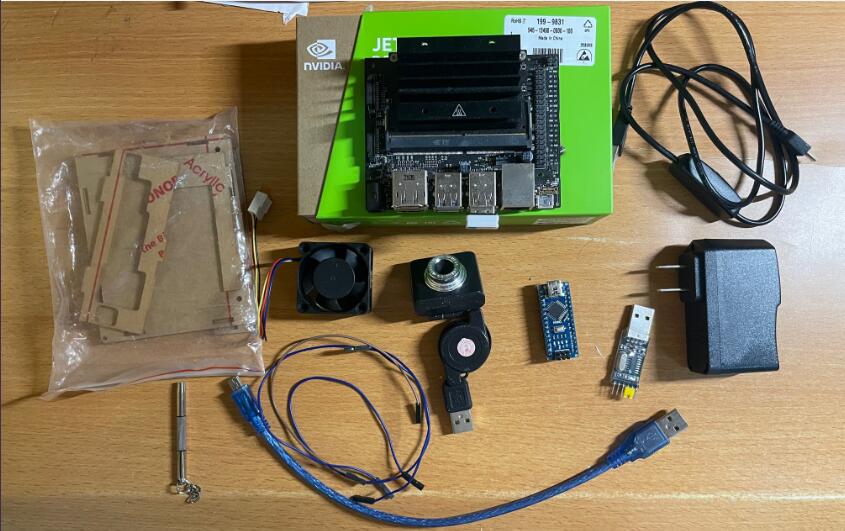
配料表:
Jetson nano x1 Arduino x1 摄像头 x1
电源、无线网卡、网线、风扇
如有外接显示器可以直接用外接显示器而不需要网线连SSH
1.JetsonNano的部署
我这里有一块上好的JetsonNano板,打算在同一局域网下使用ssh连接下面详述
1.Jetson nano的连接
首先如果你有屏幕可以直接用屏幕本条就可以直接忽略
但是如果你是像我一样没有屏幕的玩家,可以通过serial串口进行连接、ssh进行连接、或者VNC远程桌面连接
我是没有显示屏的,我采用的是先使用串口进行连接,使用笔记本电脑开启移动热点,然后使用nano命令行连接wifi,再查询ip地址,知道了ip地址就可以使用ssh连接或使用VNC远程桌面了
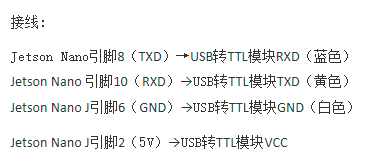
使用串口连接,连接
下面是jetson nano的引脚图
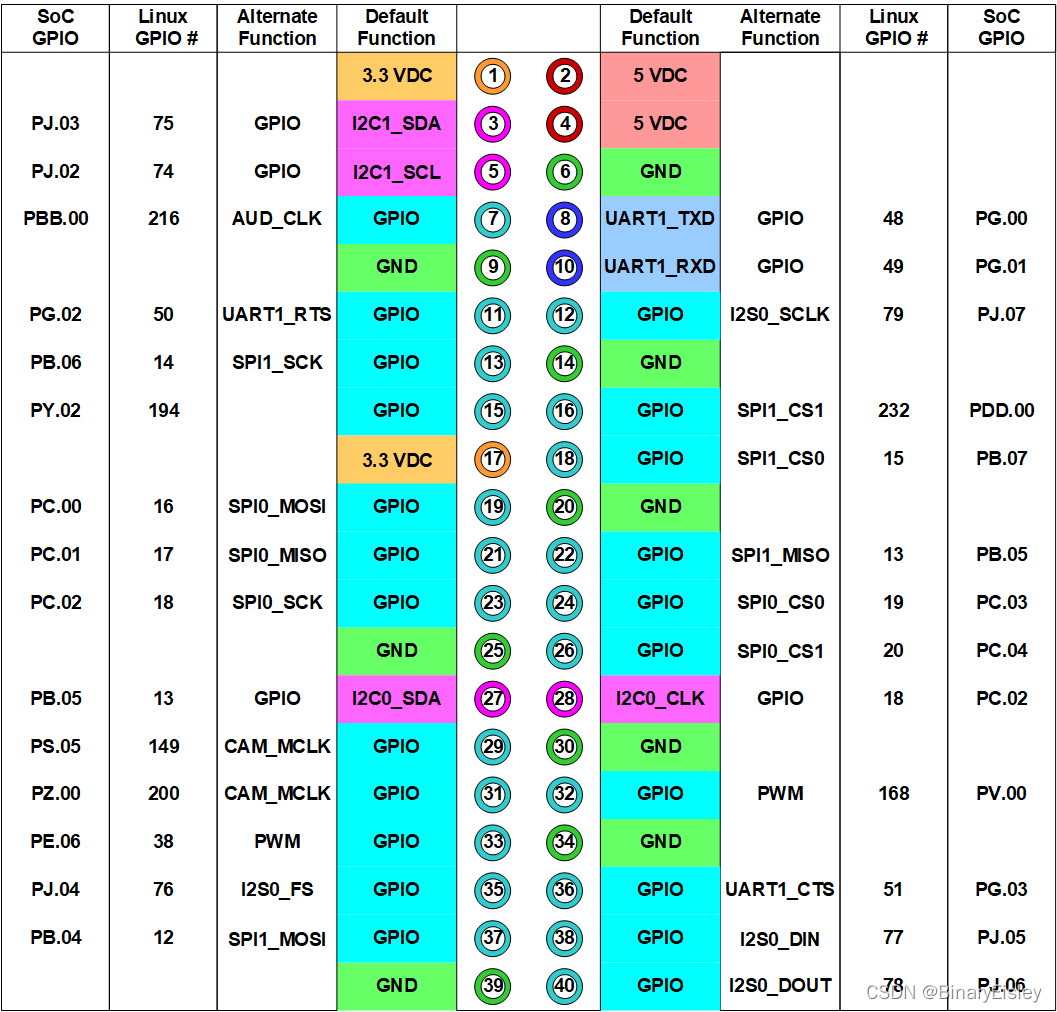
按照此引脚图进行连接
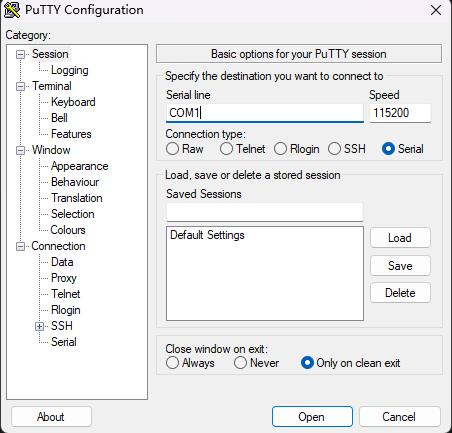
使用putty,采用对应的COM口,使用波特率115200
首先使用命令进行网络设备扫描
sudo nmcli dev
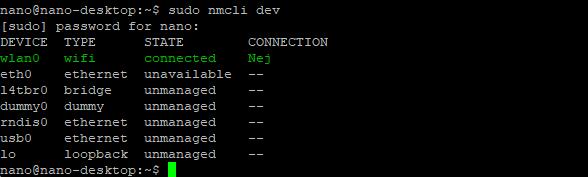
可以看见我有wlan0 作为wifi设备,这里我已经连接过了,所以显示connected
使用命令
sudo nmcli dev wifi connect "wifi名称" password "wifi密码" ifname wlan0
进行wifi的连接
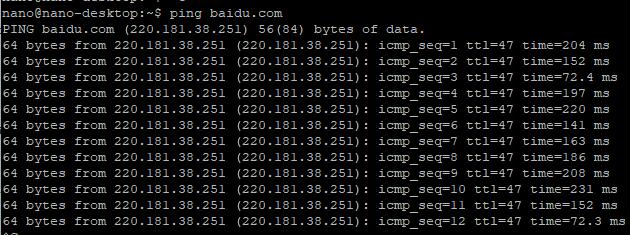
然后我们可以使用ping命令检测网络的连通性,这里我直接ping百度了,可以看见是连通的
使用命令
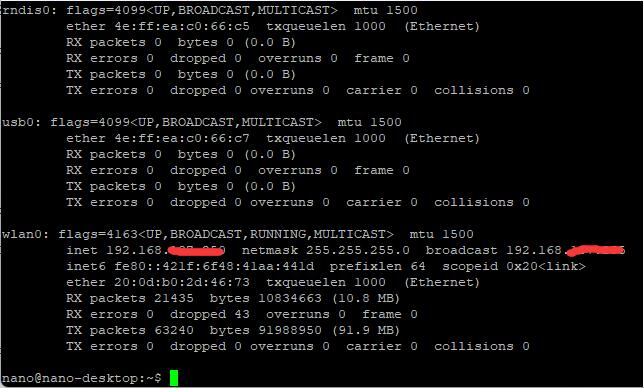
ifconfig
命令查看ip地址,在wlan0后,显示了ip地址:划红线的地方
2.查看CUDA版本与jetpack版本以选择预测库
nvcc -V
来查看cuda版本

这里可以看到我的cuda是10.2的
使用命令
sudo apt-cache show nvidia-jetpack
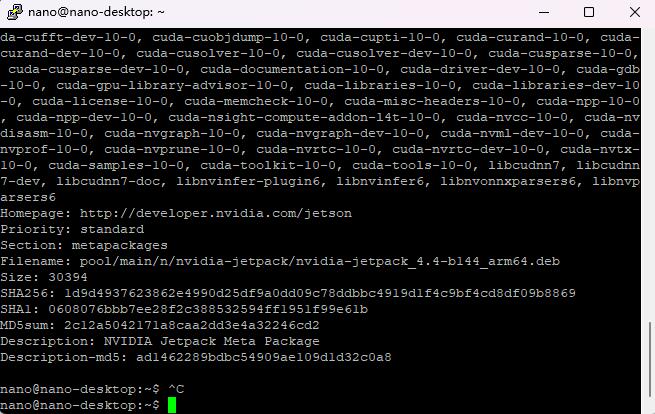
由Filename可以看出
Filename: pool/main/n/nvidia-jetpack/nvidia-jetpack_4.4-b144_arm64.deb
我的jetpack版本为jetpack_4.4
3.部署安装paddle
这里我直接使用whl包安装对应的linux的预测库
预测库地址
按照上述的对应版本最终我选用了 Jetpack4.5(4.4): nv_jetson-cuda10.2-trt7-nano
4.部署paddledet
如同aistudio上部署一样,我们依然需要先git clone以下paddledetection的库这里不再赘述
git clone https://gitee.com/paddlepaddle/PaddleDetection.git
依然是
#进入文件夹
cd PaddleDetection/
#安装其他依赖
pip3 install -r requirements.txt
#编译安装paddledet
cd PaddleDetection
python3 setup.py install
当命令行最后一行执行出现
Finished processing dependencies for paddledet==2.3.0
完成安装
通过后可以通过
python ppdet/modeling/tests/test_architectures.py
检测一下是否成功
出现下图时即可判定成功
按照官方给的教程来即可,或者好像可以直接pip安装包,连编译都不要
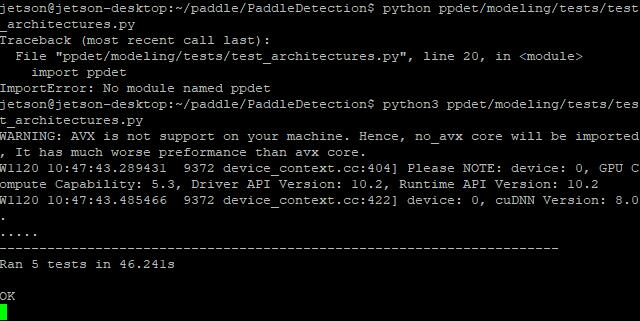
- 没使用Tensorrt的板子算力就是弱,跑了我46秒多
这里可以看见报了个Warning,不过不用担心,只要不是Error就可以当作看不见🤭
现在可以把我们训练好的模型放入进行预测,不过得先更改一下configs配置的相关内容
找到configs下datasets中的voc.yml
vim voc.yml
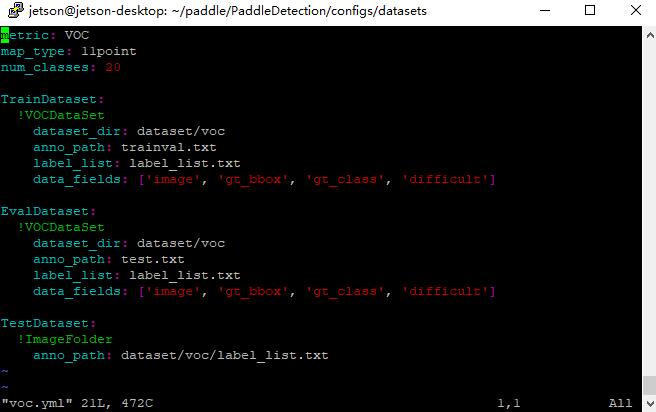
更改为
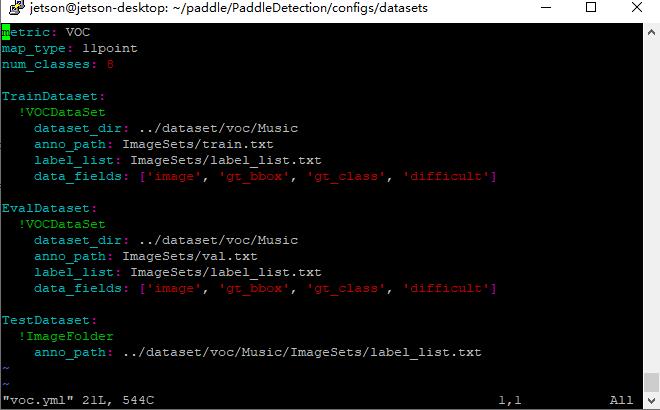
就是地址改一改,classnum改一改
别忘记把labellist放上去,这个时候不用放数据集了
训练好的权重放在一个自己喜欢的地方即可,等会命令行调用的时候改一下地址即可
在tool文件夹下执行
python3 infer.py -c ../configs/ppyolo/ppyolo_r50vd_dcn_voc.yml --infer_img=one1.jpg -o weights=model_final.pdparams
注意,jetsonnano中直接使用python是调用python2,而使用python3的时候才是调用python3的
- 不过,性能实在太差,运行了6分种左右被系统Killed了
部署还是没有问题的,这也就凸显出tensorrt的必要了
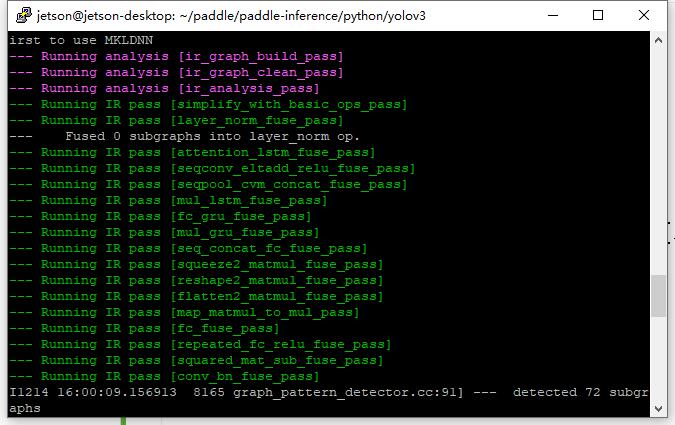
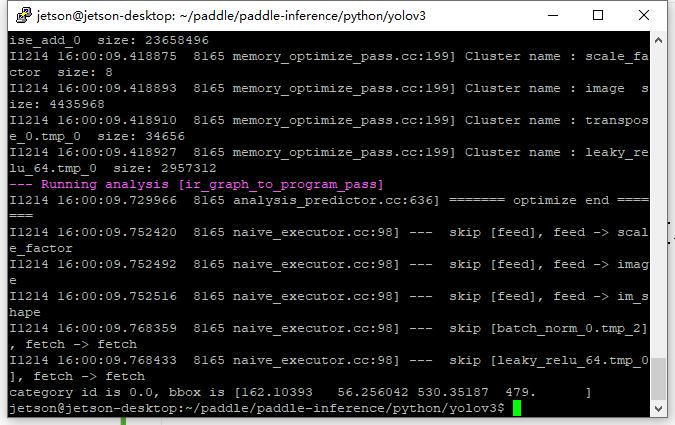
- 下面进行paddleinference的部署(可以调用tensorrt进行加速)
在aistudio中进行模型的导出
python export_model.py -c ../configs/yolov3/yolov3_darknet53_270e_voc.yml -o weights=model_final.pdparams
将模型导出到
inference_model/yolov3_darknet53_270e_voc文件夹下
分别为
infer_cfg.yml, model.pdiparams, model.pdiparams.info, model.pdmodel
通过使用这些导出的模型文件可以使用Jetson nano带的Tensorrt加速
5.paddle_inference的部署
使用 git clone https://gitee.com/myxxr/paddle-inference.git
测试环境
进入jetson_inference文件夹的yolov3例程

运行bash run.sh将例程跑通就可以开始,或者可以跑resnet50的例程
注意,如果报缺少包的错误则需要将run.sh文件中执行的python 改为python3
6.单张图像预测demo:
在yolov3目录下创建 predict.py,复制以下代码
下面将给出视频流和加上位机的demo,因为是根据例程改的,改的有些乱所以直接都给出
import numpy as np
import argparse
import cv2
from PIL import Image

from paddle.inference import Config
from paddle.inference import create_predictor

from utils import preprocess, draw_bbox


def init_predictor(args):
    if args.model_dir != "":
        config = Config(args.model_dir)
    else:
        config = Config(args.model_file, args.params_file)

    config.enable_memory_optim()
    if args.use_gpu:
        config.enable_use_gpu(500, 0)
    else:
        # If not specific mkldnn, you can set the blas thread.
        # The thread num should not be greater than the number of cores in the CPU.
        config.set_cpu_math_library_num_threads(4)
        config.enable_mkldnn()

    predictor = create_predictor(config)
    return predictor


def run(predictor, img):
    # copy img data to input tensor
    input_names = predictor.get_input_names()
    for i, name in enumerate(input_names):
        input_tensor = predictor.get_input_handle(name)
        input_tensor.reshape(img[i].shape)
        input_tensor.copy_from_cpu(img[i].copy())

    # do the inference
    predictor.run()

    results = []
    # get out data from output tensor
    output_names = predictor.get_output_names()
    for i, name in enumerate(output_names):
        output_tensor = predictor.get_output_handle(name)
        output_data = output_tensor.copy_to_cpu()
        results.append(output_data)
    return results


def parse_args():
    parser = argparse.ArgumentParser()
    parser.add_argument(
        "--model_file",
        type=str,
        default="yolov3_darknet53_270e_voc/model.pdmodel",
        help="Model filename, Specify this when your model is a combined model."
    )
    parser.add_argument(
        "--params_file",
        type=str,
        default="yolov3_darknet53_270e_voc/model.pdiparams",
        help=
        "Parameter filename, Specify this when your model is a combined model."
    )
    parser.add_argument(
        "--model_dir",
        type=str,
        default="",
        help=
        "Model dir, If you load a non-combined model, specify the directory of the model."
    )
    parser.add_argument("--use_gpu",
                        type=int,
                        default=0,
                        help="Whether use gpu.")
    return parser.parse_args()


if __name__ == '__main__':
    args = parse_args()
    img_name = 'one1.jpg'
    save_img_name = 'res.jpg'
    im_size = 608
    pred = init_predictor(args)
    img = cv2.imread(img_name)
    data = preprocess(img, im_size)
    scale_factor = np.array([im_size * 1. / img.shape[0], im_size * 1. / img.shape[1]]).reshape((1, 2)).astype(np.float32)
    im_shape = np.array([im_size, im_size]).reshape((1, 2)).astype(np.float32)
    result = run(pred, [im_shape, data, scale_factor])
    img = Image.open(img_name).convert('RGB')
    draw_bbox(img, result[0], save_name=save_img_name)
如果训练的模型也是yolov3_darknet53_270e_voc,则直接在相同目录下执行
python3 predict.py
如果不是则在命令行中加入相应的文件地址
示例
python3 predict.py --model_file 相对路径.pdmodel --params_file 相对路径.pdiparams --use_gpu 0
运行成功应为上图结果
7.视频流检测demo:
import numpy as np
import argparse
import cv2
from PIL import Image
import time

from paddle.inference import Config
from paddle.inference import create_predictor
from paddle.inference import PrecisionType

from utils import preprocess, draw_bbox,return_bbox


def init_predictor(args):
    if args.model_dir != "":
        config = Config(args.model_dir)
    else:
        config = Config(args.model_file, args.params_file)

    config.enable_memory_optim()
    if args.use_gpu:
        config.switch_ir_optim()
        config.enable_use_gpu(500, 0)
    else:
        # If not specific mkldnn, you can set the blas thread.
        # The thread num should not be greater than the number of cores in the CPU.
        config.set_cpu_math_library_num_threads(4)
        config.enable_mkldnn()
    config.enable_tensorrt_engine(workspace_size=1 << 30, precision_mode=PrecisionType.Half,max_batch_size=1, min_subgraph_size=5, use_static=False, use_calib_mode=False)
    predictor = create_predictor(config)
    return predictor


def run(predictor, img):
    # copy img data to input tensor
    input_names = predictor.get_input_names()
    for i, name in enumerate(input_names):
        input_tensor = predictor.get_input_handle(name)
        input_tensor.reshape(img[i].shape)
        input_tensor.copy_from_cpu(img[i].copy())

    # do the inference
    predictor.run()

    results = []
    # get out data from output tensor
    output_names = predictor.get_output_names()
    for i, name in enumerate(output_names):
        output_tensor = predictor.get_output_handle(name)
        output_data = output_tensor.copy_to_cpu()
        results.append(output_data)
    return results


def parse_args():
    parser = argparse.ArgumentParser()
    parser.add_argument(
        "--model_file",
        type=str,
        default="yolov3_mobilenet_v1_ssld_270e_voc/model.pdmodel",
        help="Model filename, Specify this when your model is a combined model."
    )
    parser.add_argument(
        "--params_file",
        type=str,
        default="yolov3_mobilenet_v1_ssld_270e_voc/model.pdiparams",
        help=
        "Parameter filename, Specify this when your model is a combined model."
    )
    parser.add_argument(
        "--model_dir",
        type=str,
        default="",
        help=
        "Model dir, If you load a non-combined model, specify the directory of the model."
    )
    parser.add_argument("--use_gpu",
                        type=int,
                        default=1,
                        help="Whether use gpu.")
    return parser.parse_args()


if __name__ == '__main__':
    args = parse_args()


    im_size =320
    pred = init_predictor(args)

    capture = cv2.VideoCapture(0)
    fps = 0.0
    while(True):
        t1 = time.time()
        ref, img = capture.read()
        if not ref:
            break
        img= cv2.cvtColor(img,cv2.COLOR_BGR2RGB)
        data = preprocess(img, im_size)
        scale_factor = np.array([im_size * 1. / img.shape[0], im_size * 1. / img.shape[1]]).reshape((1, 2)).astype(np.float32)
        im_shape = np.array([im_size, im_size]).reshape((1, 2)).astype(np.float32)
        result = run(pred, [im_shape, data, scale_factor])
        fps  = ( fps + (1./(time.time()-t1)) ) / 2
        print("fps= %.2f"%(fps))
        return_bbox(result[0])
        #print(len(result[0]))
        c = cv2.waitKey(1) & 0xff
        if c==27:
            capture.release()
            break
8.上位机加视频流检测demo:
import numpy as np
import argparse
import cv2
from PIL import Image
import time

from paddle.inference import Config
from paddle.inference import create_predictor
from paddle.inference import PrecisionType

from utils import preprocess, draw_bbox
import serial as ser
import struct,time

se = ser.Serial(
    port="/dev/ttyACM0",
    baudrate=115200,
    bytesize=ser.EIGHTBITS,
    parity=ser.PARITY_NONE,
    stopbits=ser.STOPBITS_ONE

)

time.sleep(2)

flag = 0

def init_predictor(args):
    if args.model_dir != "":
        config = Config(args.model_dir)
    else:
        config = Config(args.model_file, args.params_file)

    config.enable_memory_optim()
    if args.use_gpu:
        config.switch_ir_optim()
        config.enable_use_gpu(500, 0)
    else:
        # If not specific mkldnn, you can set the blas thread.
        # The thread num should not be greater than the number of cores in the CPU.
        config.set_cpu_math_library_num_threads(4)
        config.enable_mkldnn()
    #config.enable_tensorrt_engine(workspace_size=1 << 30, precision_mode=PrecisionType.Half,max_batch_size=1, min_subgraph_size=5, use_static=False, use_calib_mode=False)
    predictor = create_predictor(config)
    return predictor

def run(predictor, img):
    # copy img data to input tensor
    input_names = predictor.get_input_names()
    for i, name in enumerate(input_names):
        input_tensor = predictor.get_input_handle(name)
        input_tensor.reshape(img[i].shape)
        input_tensor.copy_from_cpu(img[i].copy())

    # do the inference
    predictor.run()

    results = []
    # get out data from output tensor
    output_names = predictor.get_output_names()
    for i, name in enumerate(output_names):
        output_tensor = predictor.get_output_handle(name)
        output_data = output_tensor.copy_to_cpu()
        results.append(output_data)
    return results


def parse_args():
    parser = argparse.ArgumentParser()
    parser.add_argument(
        "--model_file",
        type=str,
        default="ppyolo_mbv3_small_coco/model.pdmodel",
        help="Model filename, Specify this when your model is a combined model."
    )
    parser.add_argument(
        "--params_file",
        type=str,
        default="ppyolo_mbv3_small_coco/model.pdiparams",
        help=
        "Parameter filename, Specify this when your model is a combined model."
    )
    parser.add_argument(
        "--model_dir",
        type=str,
        default="",
        help=
        "Model dir, If you load a non-combined model, specify the directory of the model."
    )
    parser.add_argument("--use_gpu",
                        type=int,
                        default=0,
                        help="Whether use gpu.")
    return parser.parse_args()

def return_bbox(result, threshold=0.5):
    """draw bbox"""
    all_bbox = []
    for res in result:
        cat_id, score, bbox = res[0], res[1], res[2:]
        if score < threshold:
            continue
            return all_bbox
        xmin, ymin, xmax, ymax = bbox
        all_bbox.append({"id":cat_id,"score":score,"location":bbox  })
        print('category id is {}, bbox is {}'.format(cat_id, bbox))
        return all_bbox
        #if len(all_bbox):
        #        print(int(all_bbox[-1]['id']))
        #        if flag!=int(all_bbox[-1]['id']):
        #                se.write((str(int(all_bbox[-1]['id'])+1)+"\n").encode())
        #        flag = int(all_bbox[-1]['id'])


if __name__ == '__main__':
    args = parse_args()
    im_size =320
    pred = init_predictor(args)
    all_bbox = []
    capture = cv2.VideoCapture(0)
    fps = 0.0
    while(True):
        t1 = time.time()
        ref, img = capture.read()
        if not ref:
            break
        img= cv2.cvtColor(img,cv2.COLOR_BGR2RGB)
        data = preprocess(img, im_size)
        scale_factor = np.array([im_size * 1. / img.shape[0], im_size * 1. / img.shape[1]]).reshape((1, 2)).astype(np.float32)
        im_shape = np.array([im_size, im_size]).reshape((1, 2)).astype(np.float32)
        result = run(pred, [im_shape, data, scale_factor])
        fps  = ( fps + (1./(time.time()-t1)) ) / 2
        print("fps= %.2f"%(fps))
        all_box = return_bbox(result[0])
        if len(all_bbox)>0:
                print(int(all_bbox[-1]['id']))
                if flag!=int(all_bbox[-1]['id']):
                        se.write((str(int(all_bbox[-1]['id'])+1)+"\n").encode())
                flag = int(all_bbox[-1]['id'])


        #print(len(result[0]))
        c = cv2.waitKey(1) & 0xff
        if c==27:
            capture.release()
            break
最后的文件夹结构是
||
||
||---weight
||
||
||---util.py
||
||
||---video.py
||
其中weight是经paddledetection导出后的权重模型
video.py是你使用的视频流检测demo还是单张图检测demo还是带上位机的部分
可以看见上述demo中还引用了util文件中的内容,util.py文件内容如下
9.util.py代码
import cv2
import numpy as np
from PIL import Image, ImageDraw


def resize(img, target_size):
    """resize to target size"""
    if not isinstance(img, np.ndarray):
        raise TypeError('image type is not numpy.')
    im_shape = img.shape
    im_size_min = np.min(im_shape[0:2])
    im_size_max = np.max(im_shape[0:2])
    im_scale_x = float(target_size) / float(im_shape[1])
    im_scale_y = float(target_size) / float(im_shape[0])
    img = cv2.resize(img, None, None, fx=im_scale_x, fy=im_scale_y)
    return img


def normalize(img, mean, std):
    img = img / 255.0
    mean = np.array(mean)[np.newaxis, np.newaxis, :]
    std = np.array(std)[np.newaxis, np.newaxis, :]
    img -= mean
    img /= std
    return img


def preprocess(img, img_size):
    mean = [0.485, 0.456, 0.406]
    std = [0.229, 0.224, 0.225]
    img = resize(img, img_size)
    img = img[:, :, ::-1].astype('float32')  # bgr -> rgb
    img = normalize(img, mean, std)
    img = img.transpose((2, 0, 1))  # hwc -> chw
    return img[np.newaxis, :]


def draw_bbox(img, result, threshold=0.5, save_name='res.jpg'):
    """draw bbox"""
    draw = ImageDraw.Draw(img)
    for res in result:
        cat_id, score, bbox = res[0], res[1], res[2:]
        if score < threshold:
            continue
        xmin, ymin, xmax, ymax = bbox
        draw.line([(xmin, ymin), (xmin, ymax), (xmax, ymax), (xmax, ymin),
                   (xmin, ymin)],
                  width=2,
                  fill=(255, 0, 0))
        print('category id is {}, bbox is {}'.format(cat_id, bbox))
    img.save(save_name, quality=95)

def return_bbox(result, threshold=0.5):
    """draw bbox"""
    all_bbox = []
    for res in result:
        cat_id, score, bbox = res[0], res[1], res[2:]
        if score < threshold:
            continue
        xmin, ymin, xmax, ymax = bbox
        all_bbox.append({"id":cat_id,"score":score,"location":bbox  })
        print('category id is {}, bbox is {}'.format(cat_id, bbox))
    return all_bbox
2.Arduino控制代码
Arduino使用到了PWM库
PWM库给出网盘链接
链接:https://pan.baidu.com/s/1pEHHU1nfRWSwO00rkM0WOg
提取码:haha
#include <PWM.h>

#define dDo 175
#define dRe 196
#define dMi 221
#define dFa 234
#define dSol 262
#define dLa 294
#define dSi 330

#define Do 350
#define Re 393
#define Mi 441
#define Fa 495
#define Sol 556
#define La 624
#define Si 661

int pin = 9;                // led所连接到的引脚
int brightness = 100;         // led的亮度,也就是占空比,范围是0-255
//0-6,7-14,14-20
int32_t fre[21]={dDo,dRe,dMi,dFa,dSol,dLa,dSi,Do,Re,Mi,Fa,Sol,La,Si};

int message = 0;//用于接收信息进行对比

//void cf(int32_t mark,int32_t last,int32_t h_l=1)
void cf(int32_t mark)//mark 为标号,last 为持续时长
{
    mark-=1;
    bool success = SetPinFrequencySafe(pin, fre[mark]);
    pwmWrite(pin, brightness);
}

void setup()
{
  // 初始化除了0号计时器以外的其他计时器
  InitTimersSafe();

  // 设置指定引脚的频率
  bool success = SetPinFrequencySafe(pin, dDo);

  delay(300);
  Serial.begin(9600);//初始化串口函数


}

void loop()
{
  //Serial.println("6");
//  Serial.println(Serial.parseInt());

  if (Serial.available() > 0)//串口接收到数据
  {
      int incomedate = Serial.parseInt();//获取串口接收到的数据
      Serial.println(incomedate);
//      pwmWrite(pin, brightness);
//      delay(300);
      if (incomedate>0){
        cf(incomedate);

        delay(300);
        Serial.println(incomedate);
        pwmWrite(pin, 0);

      }

  }
}
总结
使用PaddleDetection及其配件完成基础代码的训练和提交,包括数据集格式转换、模型训练、模型导出。
使用PaddleInference完成模型的部署,使用Arduino作为上位机,beep为外设
通过本次的AI达人创造营学习了从Paddle环境的搭建、训练再到产出模型一气呵成,再使用jetsonnano部署模型控制下位机。
在模型的部署方面paddle也提供了方便的trt加速套件,paddleInference简单的api使得初学者可以方便地在自己的机器上进行部署