Are you sure you want to delete this task? Once this task is deleted, it cannot be recovered.
You can not select more than 25 topics
Topics must start with a chinese character,a letter or number, can include dashes ('-') and can be up to 35 characters long.
 Antonio.Chan
040f96677f
Antonio.Chan
040f96677f
|
2 years ago | |
|---|---|---|
| .. | ||
| configs | 2 years ago | |
| datasets | 2 years ago | |
| demo | 2 years ago | |
| external | 2 years ago | |
| models | 2 years ago | |
| net_utils | 2 years ago | |
| out/samples | 2 years ago | |
| utils | 2 years ago | |
| LICENSE | 2 years ago | |
| README.md | 2 years ago | |
| demo.py | 2 years ago | |
| environment.yml | 2 years ago | |
| main.py | 2 years ago | |
| requirements.txt | 2 years ago | |
| setup.py | 2 years ago | |
| test.py | 2 years ago | |
| test_epoch.py | 2 years ago | |
| train.py | 2 years ago | |
| train_epoch.py | 2 years ago | |
README.md
RfD-Net [Project Page] [Paper] [Video]
RfD-Net: Point Scene Understanding by Semantic Instance Reconstruction
Yinyu Nie, Ji Hou, Xiaoguang Han, Matthias Nießner
In CVPR, 2021.


From an incomplete point cloud of a 3D scene (left), our method learns to jointly understand the 3D objects and reconstruct instance meshes as the output (right).
Install
-
This implementation uses Python 3.6, Pytorch1.7.1, cudatoolkit 11.0. We recommend to use conda to deploy the environment.
- Install with conda:
conda env create -f environment.yml conda activate rfdnet- Install with pip:
pip install -r requirements.txt -
Next, compile the external libraries by
python setup.py build_ext --inplace -
Install PointNet++ by
export CUDA_HOME=/usr/local/cuda-X.X  # replace cuda-X.X with your cuda version.
cd external/pointnet2_ops_lib
pip install .
Demo
The pretrained model can be downloaded here. Put the pretrained model in the directory as below
out/pretrained_models/pretrained_weight.pth
A demo is illustrated below to see how our method works.
cd RfDNet
python main.py --config configs/config_files/ISCNet_test.yaml --mode demo --demo_path demo/inputs/scene0549_00.off
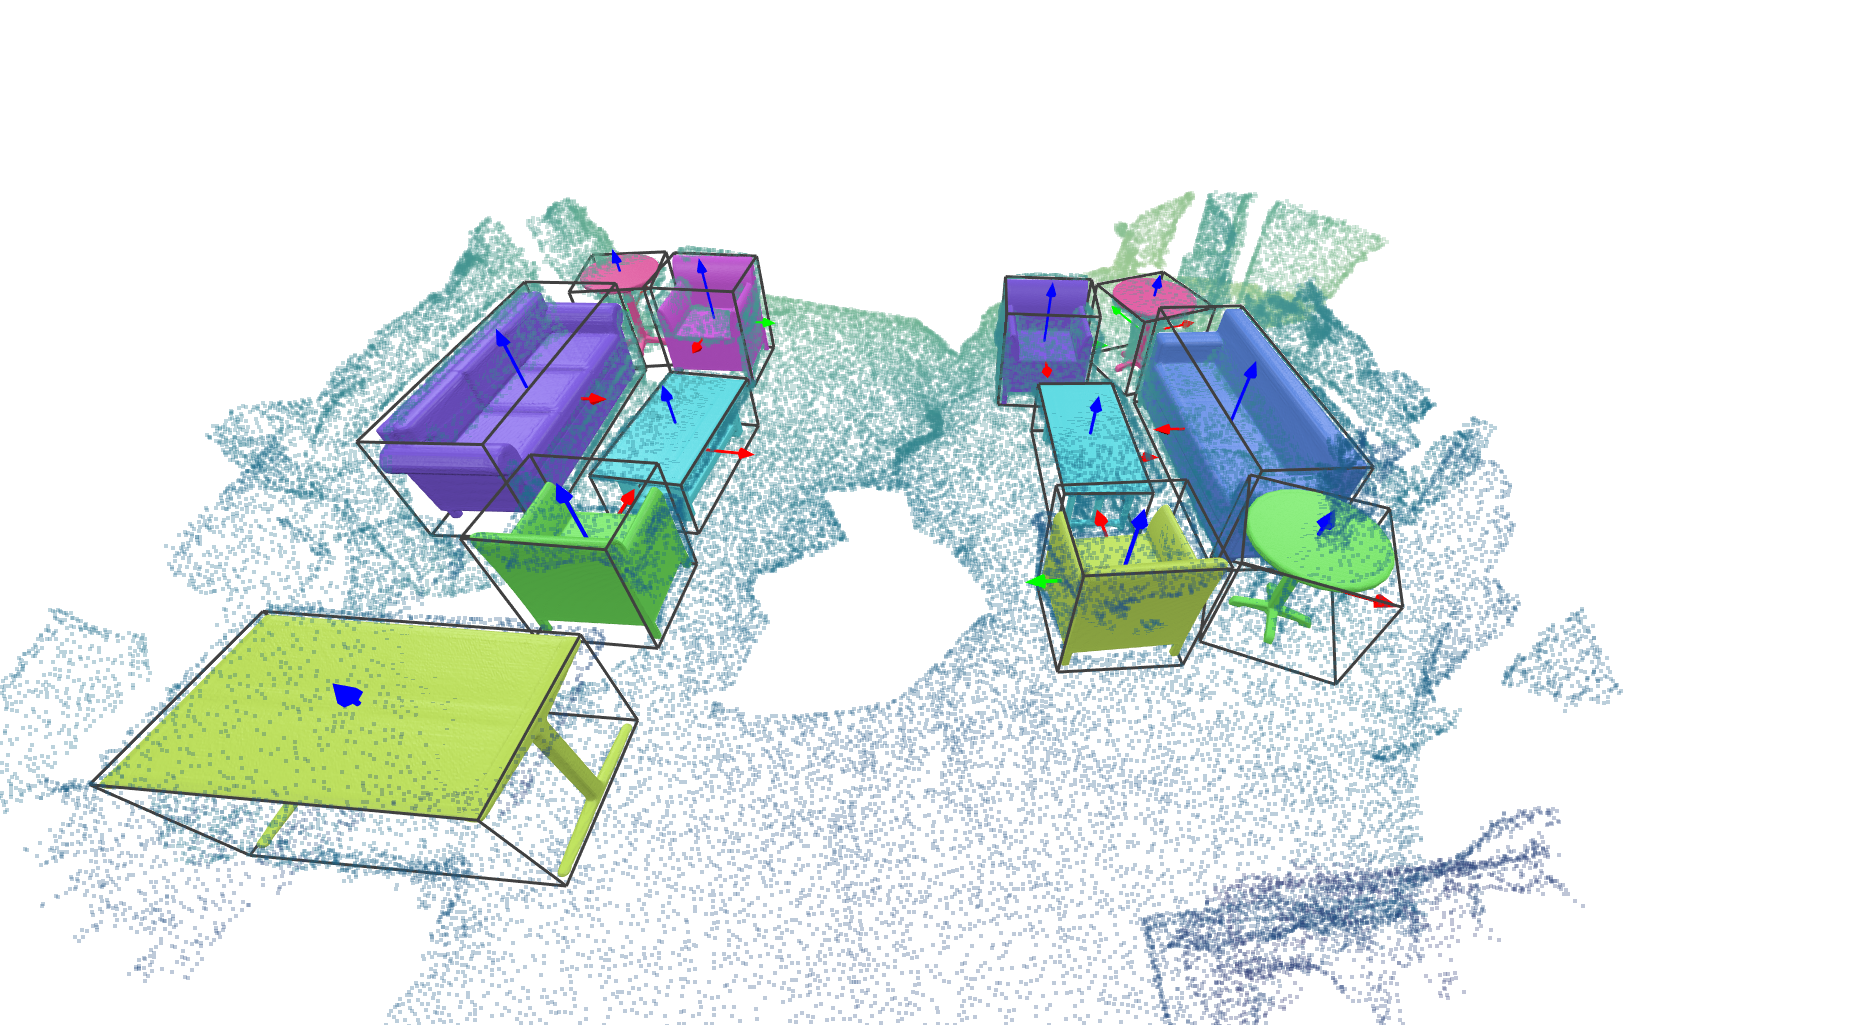
VTK is used here to visualize the 3D scenes. The outputs will be saved under 'demo/outputs'. You can also play with your toy with this script.
If everything goes smooth, there will be a GUI window popped up and you can interact with the scene as below.

You can also use the offscreen mode by setting offline=True in demo.py to render the 3D scene.
The rendered image will be saved in demo/outputs/some_scene_id/pred.png.
Prepare Data
In our paper, we use the input point cloud from the ScanNet dataset, and the annotated instance CAD models from the Scan2CAD dataset.
Scan2CAD aligns the object CAD models from ShapeNetCore.v2 to each object in ScanNet, and we use these aligned CAD models as the ground-truth.
Preprocess ScanNet and Scan2CAD data
You can either directly download the processed samples [link] to the directory below (recommended)
datasets/scannet/processed_data/
or
- Ask for the ScanNet dataset and download it to
datasets/scannet/scans - Ask for the Scan2CAD dataset and download it to
datasets/scannet/scan2cad_download_link - Preprocess the ScanNet and Scan2CAD dataset for training by
cd RfDNet
python utils/scannet/gen_scannet_w_orientation.py
Preprocess ShapeNet data
You can either directly download the processed data [link] and extract them to datasets/ShapeNetv2_data/ as below
datasets/ShapeNetv2_data/point
datasets/ShapeNetv2_data/pointcloud
datasets/ShapeNetv2_data/voxel
datasets/ShapeNetv2_data/watertight_scaled_simplified
or
-
Download ShapeNetCore.v2 to the path below
datasets/ShapeNetCore.v2 -
Process ShapeNet models into watertight meshes by
python utils/shapenet/1_fuse_shapenetv2.py -
Sample points on ShapeNet models for training (similar to Occupancy Networks).
python utils/shapenet/2_sample_mesh.py --resize --packbits --float16 -
There are usually 100K+ points per object mesh. We simplify them to speed up our testing and visualization by
python utils/shapenet/3_simplify_fusion.py --in_dir datasets/ShapeNetv2_data/watertight_scaled --out_dir datasets/ShapeNetv2_data/watertight_scaled_simplified
Verify preprocessed data
After preprocessed the data, you can run the visualization script below to check if they are generated correctly.
-
Visualize ScanNet+Scan2CAD+ShapeNet samples by
python utils/scannet/visualization/vis_gt.pyA VTK window will be popped up like below.

Training, Generating and Evaluation
We use the configuration file (see 'configs/config_files/****.yaml') to fully control the training/testing/generating process.
You can check a template at configs/config_files/ISCNet.yaml.
Training
We firstly pretrain our detection module and completion module followed by a joint refining. You can follow the process below.
-
Pretrain the detection module by
python main.py --config configs/config_files/ISCNet_detection.yaml --mode trainIt will save the detection module weight at
out/iscnet/a_folder_with_detection_module/model_best.pth -
Copy the weight path of detection module (see 1.) into
configs/config_files/ISCNet_completion.yamlasweight: ['out/iscnet/a_folder_with_detection_module/model_best.pth']Then pretrain the completion module by
python main.py --config configs/config_files/ISCNet_completion.yaml --mode trainIt will save the completion module weight at
out/iscnet/a_folder_with_completion_module/model_best.pth -
Copy the weight path of completion module (see 2.) into
configs/config_files/ISCNet.yamlasweight: ['out/iscnet/a_folder_with_completion_module/model_best.pth']Then jointly finetune RfD-Net by
python main.py --config configs/config_files/ISCNet.yaml --mode trainIt will save the trained model weight at
out/iscnet/a_folder_with_RfD-Net/model_best.pth
Generating
Copy the weight path of RfD-Net (see 3. above) into configs/config_files/ISCNet_test.yaml as
weight: ['out/iscnet/a_folder_with_RfD-Net/model_best.pth']
Run below to output all scenes in the test set.
python main.py --config configs/config_files/ISCNet_test.yaml --mode test
The 3D scenes for visualization are saved in the folder of out/iscnet/a_folder_with_generated_scenes/visualization. You can visualize a triplet of (input, pred, gt) following a demo below
python utils/scannet/visualization/vis_for_comparison.py
If everything goes smooth, there will be three windows (corresponding to input, pred, gt) popped up by sequence as
| Input | Prediction | Ground-truth |
|---|---|---|
|
|
 |
Evaluation
You can choose each of the following ways for evaluation.
-
You can export all scenes above to calculate the evaluation metrics with any external library (for researchers who would like to unify the benchmark).
Lower thedump_thresholdinISCNet_test.yamlin generation to enable more object proposals for mAP calculation (e.g.dump_threshold=0.05). -
In our evaluation, we voxelize the 3D scenes to keep consistent resolution with the baseline methods. To enable this,
-
make sure the executable binvox are downloaded and configured as an experiment variable (e.g. export its path in ~/.bashrc for Ubuntu). It will be deployed by Trimesh.
-
Change the
ISCNet_test.yamlas below for evaluation.
   test:
     evaluate_mesh_mAP: True
   generation:
     dump_results: False
Run below to report the evaluation results.
python main.py --config configs/config_files/ISCNet_test.yaml --mode testThe log file will saved in
out/iscnet/a_folder_named_with_script_time/log.txt -
Differences to the paper
- The original paper was implemented with Pytorch 1.1.0,
and we reconfigure our code to fit with Pytorch 1.7.1. - A post processing step to align the reconstructed shapes to the input scan is supported. We have verified that it can improve the evaluation performance by a small margin.
You can switch on/off it followingdemo.py. - A different learning rate scheduler is adopted.
The learning rate decreases to 0.1x if there is no gain within 20 steps, which is much more efficient.
Citation
If you find our work helpful, please consider citing
@InProceedings{Nie_2021_CVPR,
    author    = {Nie, Yinyu and Hou, Ji and Han, Xiaoguang and Niessner, Matthias},
    title     = {RfD-Net: Point Scene Understanding by Semantic Instance Reconstruction},
    booktitle = {Proceedings of the IEEE/CVF Conference on Computer Vision and Pattern Recognition (CVPR)},
    month     = {June},
    year      = {2021},
    pages     = {4608-4618}
}
License
RfD-Net is relased under the MIT License. See the LICENSE file for more details.
该项目旨在开源一系列机器学习相关的核心算法来解决许多现实场景中的任务。项目组通过研究计算机模拟或实现人类的学习行为,以获取新的知识或技能,重新组织已有的知识结构使之不断改善自身的性能如SVM,主成分分析(PCA),XGBT等。此外深度学习作为机器学习最重要的一个分支,近年来发展迅猛,在国内外都引起了广泛的关注。因此该项目组研发了一系列基于深度学习的核心算法,如解决点云语意的FPConv,拥挤场景下的人体关键点检测的OPEC-Net 等。
Python C Text INI Cuda other