Are you sure you want to delete this task? Once this task is deleted, it cannot be recovered.
You can not select more than 25 topics
Topics must start with a chinese character,a letter or number, can include dashes ('-') and can be up to 35 characters long.
 jingmohan
73c9243bfc
jingmohan
73c9243bfc
|
9 months ago | |
|---|---|---|
| ascend10_infer | 11 months ago | |
| scripts | 11 months ago | |
| src | 9 months ago | |
| README.md | 9 months ago | |
| default_config.yaml | 9 months ago | |
| eval.py | 1 year ago | |
| export.py | 1 year ago | |
| train.py | 1 year ago | |
| train_setting.png | 11 months ago | |
README.md
内容
SABL描述
SABL算法源自2020年ECCV会议上的论文 Side-Aware Boundary Localization for More Precise Object Detection。该算法提出要通过特征图内容的边界信息来进行定位bbox的边框,取代了之前通过中心点加anchor滑窗的方式,得到了更高质量的bbox边界信息;另外还通过重得分的方式,提高了边框分类分数的质量。
论文
Wang J, Zhang W, Cao Y, et al. Side-aware boundary localization for more precise object detection[C]//European Conference on Computer Vision. Springer, Cham, 2020: 403-419.
模型架构
SABL的整体网络架构如下所示:
数据集
数据集可参考文献.
-
数据集大小: 19.3G, 123287张80类彩色图像
-
训练:19.3G, 118287张图片
-
测试:1814.3M, 5000张图片
-
-
数据格式:RGB图像.
注意:数据将在src/dataset.py 中被处理。
在训练验证前需要将数据集转换为MindRecord格式(在default_config.yaml 文件中设置only_create_dataset = True);也可以直接下载MindRecord格式数据集,链接如下:
SABL_COCO2017_MindRecord
环境要求
-
硬件(Ascend)
- 使用Ascend处理器准备硬件环境。
-
架构
-
想要获取更多信息,请检查以下资源:
-
在 ModelArts 进行训练 (如果你想在modelarts上运行,可以参考以下文档 modelarts)
# 在 ModelArts 上使用8卡训练
# (1)      在 default_config.yaml 文件中设置 "enable_modelarts=True"
#          在 default_config.yaml 文件中设置 "distribute=True"
#          在 default_config.yaml 文件中设置 "coco_root='/cache/data'"
#          在 default_config.yaml 文件中设置 "epoch_size=500"
#          在 default_config.yaml 文件中设置 "save_checkpoint_path= "/cache/train""
#          在 default_config.yaml 文件中设置 "mindrecord_dir= "/cache/data/MindRecord_COCO""
# (2) 准备模型代码
# (3) 在数据集中选择公开数据集,可根据下面链接进行搜索
#     https://openi.pcl.ac.cn/attachments/001b7f02-66b8-4ad8-9c8e-8427ec9f9272?type=1
# (4) 在网页上设置启动文件为 "train.py"
# (5) 选择MindSpore版本为1.8.1并使用八卡训练环境
# (6) 创建训练作业

# 在 ModelArts 上使用单卡验证
# (1)      在 default_config.yaml 文件中设置 "enable_modelarts=True"
#          在 default_config.yaml 文件中设置 "distribute=True"
#          在 default_config.yaml 文件中设置 "coco_root='/cache/data'"
#          在 default_config.yaml 文件中设置 "epoch_size=500"
#          在 default_config.yaml 文件中设置 "save_checkpoint_path= "/cache/train""
#          在 default_config.yaml 文件中设置 "mindrecord_dir= "/cache/data/MindRecord_COCO""
# (2) 准备模型代码
# (3) 上传你训练好的模型和权重,在default_config.yaml 文件中设置checkpoint_path。
# (4) 在数据集中选择公开数据集,可根据下面链接进行搜索
#     https://openi.pcl.ac.cn/attachments/001b7f02-66b8-4ad8-9c8e-8427ec9f9272?type=1
# (5) 在网页上设置启动文件为 "eval.py"
# (6) 创建训练作业
脚本说明
脚本和示例代码
.
└─SABL
  ├─README.md
  ├─ascend310_infer                           # 实现310推理源代码
  ├─scripts
    ├─run_single_train.sh                     # 使用Ascend环境单卡训练
    ├─run_single_train_gpu.sh
    ├─run_infer_one_image_310.sh              # 使用Ascend环境推理单张图片并可视化
    ├─run_distribute_train.sh                 # 使用Ascend环境八卡并行训练
    ├─run_distribute_train_gpu.sh
    ├─run_eval.sh                             # 使用Ascend环境运行推理脚本
    ├─run_eval_gpu.sh
  ├─src
    ├─backbone.py                             # 网络模型定义
    ├─bottleneck.py                           # 网络颈部定义
    ├─config.py                               # 参数配置
    ├─dataset.py                              # 数据预处理
    ├─retinahead.py                           # 网络预测头部定义
    ├─init_params.py                          # 参数初始化
    ├─lr_generator.py                         # 学习率生成函数
    ├─coco_eval                               # coco数据集评估
    ├─box_utils.py                            # 先验框设置
    ├─_init_.py                               # 初始化
    └──model_utils
       ├──config.py                           # 训练配置
       ├──device_adapter.py                   # 获取云上id
       ├──local_adapter.py                    # 获取本地id
       └──moxing_adapter.py                   # 参数处理
  ├─default_config.yaml                       # 参数配置
  ├─train.py                                  # 网络训练脚本
  └─eval.py                                   # 网络推理脚本
脚本参数
在train.py和default_config.yaml脚本中使用到的主要参数是:
"img_shape": [600, 600],                                                                        # 图像尺寸
"num_retinanet_boxes": 7555,                                                                    # 设置的先验方框总数
"match_thershold": 0.5,                                                                         # 匹配阈值
"softnms_sigma": 0.5,                                                                           # softnms算法σ值
"nms_thershold": 0.6,                                                                           # 非极大抑制阈值
"min_score": 0.1,                                                                               # 最低得分
"max_boxes": 100,                                                                               # 检测框最大数量
"global_step": 0,                                                                               # 全局步数
"lr_init": 1e-6,                                                                                # 初始学习率
"lr_end_rate": 5e-3,                                                                            # 最终学习率与最大学习率的比值
"warmup_epochs1": 2,                                                                            # 第一阶段warmup的周期数
"warmup_epochs2": 5,                                                                            # 第二阶段warmup的周期数
"warmup_epochs3": 23,                                                                           # 第三阶段warmup的周期数
"warmup_epochs4": 60,                                                                           # 第四阶段warmup的周期数
"warmup_epochs5": 160,                                                                          # 第五阶段warmup的周期数
"momentum": 0.9,                                                                                # momentum
"weight_decay": 1.5e-4,                                                                         # 权重衰减率
"num_default": [9, 9, 9, 9, 9],                                                                 # 单个网格中先验框的个数
"extras_out_channels": [256, 256, 256, 256, 256],                                               # 特征层输出通道数
"feature_size": [75, 38, 19, 10, 5],                                                            # 特征层尺寸
"aspect_ratios": [(0.5,1.0,2.0), (0.5,1.0,2.0), (0.5,1.0,2.0), (0.5,1.0,2.0), (0.5,1.0,2.0)],   # 先验框大小变化比值
"steps": ( 8, 16, 32, 64, 128),                                                                 # 先验框设置步长
"anchor_size":(32, 64, 128, 256, 512),                                                          # 先验框尺寸
"prior_scaling": (0.1, 0.2),                                                                    # 用于调节回归与回归在loss中占的比值
"gamma": 2.0,                                                                                   # focal loss中的参数
"alpha": 0.25,                                                                                  # focal loss中的参数
"mindrecord_dir": "/cache/data/MindRecord_COCO",                                                # mindrecord文件路径
"coco_root": "/cache/data/",                                                                    # coco数据集路径
"train_data_type": "train2017",                                                                 # train图像的文件夹名
"val_data_type": "val2017",                                                                     # val图像的文件夹名
"instances_set": "annotations_trainval2017/annotations/instances_{}.json",                      # 标签文件路径
"coco_classes": ('background', 'person', 'bicycle', 'car', 'motorcycle', 'airplane', 'bus',     # coco数据集的种类
                 'train', 'truck', 'boat', 'traffic light', 'fire hydrant',
                 'stop sign', 'parking meter', 'bench', 'bird', 'cat', 'dog',
                 'horse', 'sheep', 'cow', 'elephant', 'bear', 'zebra',
                 'giraffe', 'backpack', 'umbrella', 'handbag', 'tie',
                 'suitcase', 'frisbee', 'skis', 'snowboard', 'sports ball',
                 'kite', 'baseball bat', 'baseball glove', 'skateboard',
                 'surfboard', 'tennis racket', 'bottle', 'wine glass', 'cup',
                 'fork', 'knife', 'spoon', 'bowl', 'banana', 'apple',
                 'sandwich', 'orange', 'broccoli', 'carrot', 'hot dog', 'pizza',
                 'donut', 'cake', 'chair', 'couch', 'potted plant', 'bed',
                 'dining table', 'toilet', 'tv', 'laptop', 'mouse', 'remote',
                 'keyboard', 'cell phone', 'microwave', 'oven', 'toaster', 'sink',
                 'refrigerator', 'book', 'clock', 'vase', 'scissors',
                 'teddy bear', 'hair drier', 'toothbrush'),
"num_classes": 81,                                                                              # 数据集类别数
"voc_root": "",                                                                                 # voc数据集路径
"voc_dir": "",
"image_dir": "",                                                                                # 图像路径
"anno_path": "",                                                                                # 标签文件路径
"save_checkpoint": True,                                                                        # 保存checkpoint
"save_checkpoint_epochs": 1,                                                                    # 保存checkpoint epoch数
"keep_checkpoint_max":1,                                                                        # 保存checkpoint的最大数量
"save_checkpoint_path": "./model",                                                              # 保存checkpoint的路径
"finish_epoch":0,                                                                               # 已经运行完成的 epoch 数
"checkpoint_path":""                                                                            # 用于验证的checkpoint路径
训练过程
用法
您可以使用python或shell脚本进行训练。shell脚本的用法如下:
- Ascend:
# data和存储mindrecord文件的路径在default_config.yaml里设置

# 训练以前, 请运行:
python train.py --only_create_dataset=True --run_platform="Ascend"

# 八卡并行训练示例:
# 创建RANK_TABLE_FILE
bash run_distribute_train.sh [DEVICE_NUM] [EPOCH_SIZE] [LR] [DATASET] [RANK_TABLE_FILE] [PRE_TRAINED](optional) [PRE_TRAINED_EPOCH_SIZE](optional)

# 单卡训练示例:
bash run_single_train.sh [DEVICE_ID] [EPOCH_SIZE] [LR] [DATASET] [PRE_TRAINED](optional) [PRE_TRAINED_EPOCH_SIZE](optional)
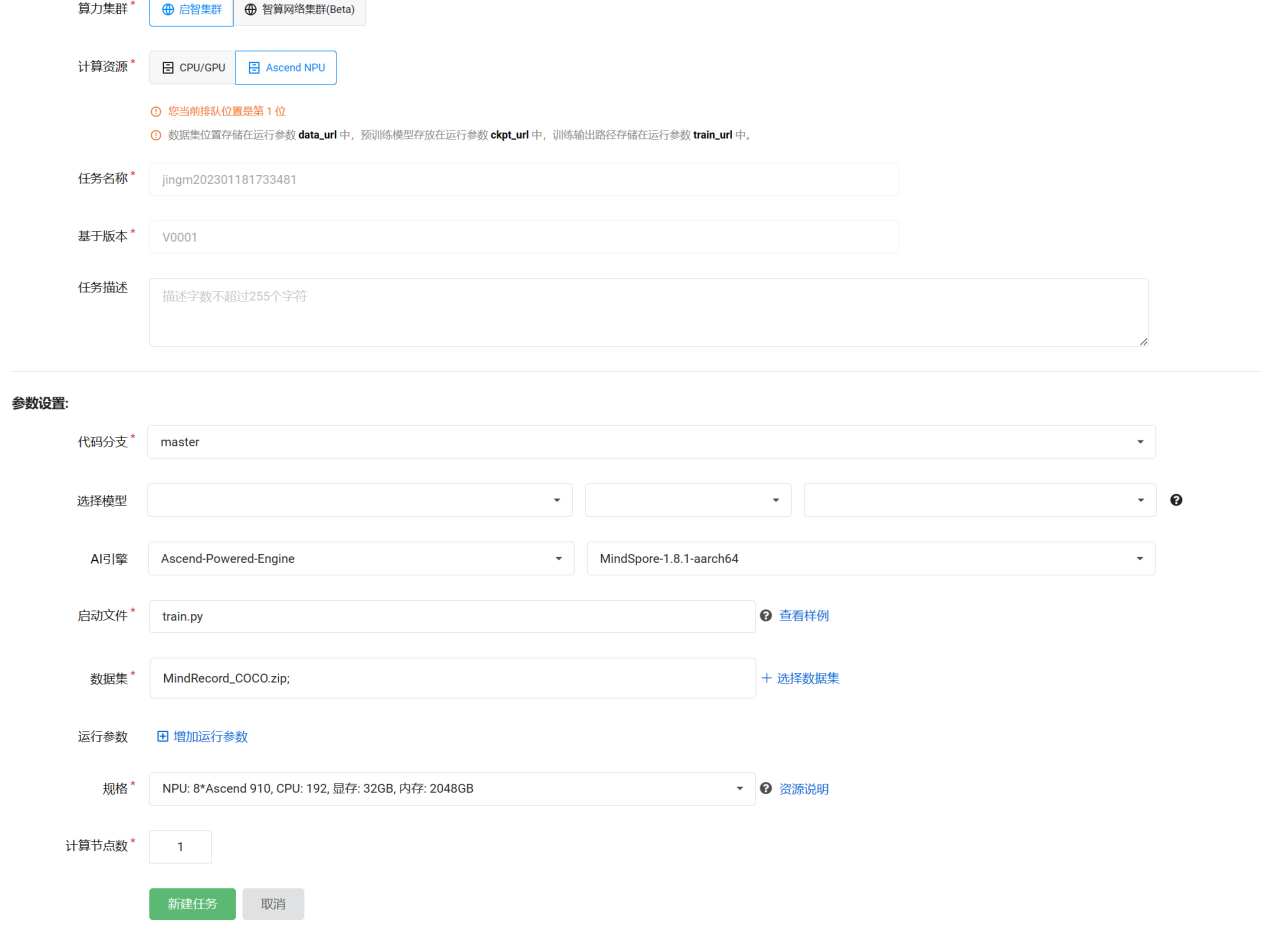
也可以按下图所示在启智平台进行训练和验证,其中所需要的数据集和预训练权重应提前上传到云端。
MindRecord_COCO.zip是mindrecord格式的coco数据集,可以在本项目数据集中找到。
- GPU
# data和存储mindrecord文件的路径在default_config.yaml里设置

# 训练以前, 请运行:
python train.py --only_create_dataset=True --run_platform="GPU"

# 八卡并行训练示例:
bash run_distribute_train_gpu.sh [DEVICE_NUM] [EPOCH_SIZE] [LR] [DATASET] [PRE_TRAINED](optional) [PRE_TRAINED_EPOCH_SIZE](optional)

# 单卡训练示例:
bash run_single_train_gpu.sh [DEVICE_ID] [EPOCH_SIZE] [LR] [DATASET] [PRE_TRAINED](optional) [PRE_TRAINED_EPOCH_SIZE](optional)
运行
- Ascend
# 八卡并行训练示例(在scripts目录下运行):
bash run_distribute_train.sh 8 500 0.05 coco scripts/rank_table_8pcs.json

# 单卡训练示例(在scripts目录下运行):
bash run_single_train.sh 0 500 0.05 coco
- GPU
# 八卡并行训练示例(在scripts目录下运行):
bash run_distribute_train_gpu.sh 8 400 0.025 coco

# 单卡训练示例(在scripts目录下运行):
bash run_single_train_gpu.sh 0 400 0.025 coco
结果
路径在default_config.yaml里设置。checkpoint将存储在 ./model 路径下,
训练日志将被记录到 ./train.log 中,训练日志部分示例如下:
epoch: 50 step: 916, loss is 0.9789904356002808
lr:[0.002333]
Train epoch time: 268096.723 ms, per step time: 292.682 ms
epoch: 51 step: 916, loss is 1.0857634544372559
lr:[0.002400]
Train epoch time: 268968.506 ms, per step time: 293.634 ms
epoch: 52 step: 916, loss is 1.0512465238571167
lr:[0.002467]
Train epoch time: 268160.372 ms, per step time: 292.751 ms
epoch: 53 step: 916, loss is 0.8317526578903198
lr:[0.002533]
Train epoch time: 268143.897 ms, per step time: 292.734 ms
评估过程
用法
可以选择在云上进行验证。和训练时唯一不同的设置参数为启动文件: train.py ==> eval.py
您也可以使用python或shell脚本进行验证。shell脚本的用法如下:
- Ascend
bash run_eval.sh [DATASET] [DEVICE_ID]
- GPU
bash run_eval_gpu.sh [DATASET] [DEVICE_ID] [CHECKPOINT_PATH]
运行
- Ascend:
bash run_eval.sh coco 0
- GPU
bash run_eval_gpu.sh coco 0 LOG/model/SABL-500_916.ckpt
checkpoint可以在训练过程中产生.
结果
计算结果将存储在示例路径中,您可以在 eval.log 查看.
 Average Precision  (AP) @[ IoU=0.50:0.95 | area=   all | maxDets=100 ] = 0.432
 Average Precision  (AP) @[ IoU=0.50      | area=   all | maxDets=100 ] = 0.601
 Average Precision  (AP) @[ IoU=0.75      | area=   all | maxDets=100 ] = 0.466
 Average Precision  (AP) @[ IoU=0.50:0.95 | area= small | maxDets=100 ] = 0.212
 Average Precision  (AP) @[ IoU=0.50:0.95 | area=medium | maxDets=100 ] = 0.452
 Average Precision  (AP) @[ IoU=0.50:0.95 | area= large | maxDets=100 ] = 0.598
 Average Recall     (AR) @[ IoU=0.50:0.95 | area=   all | maxDets=  1 ] = 0.376
 Average Recall     (AR) @[ IoU=0.50:0.95 | area=   all | maxDets= 10 ] = 0.584
 Average Recall     (AR) @[ IoU=0.50:0.95 | area=   all | maxDets=100 ] = 0.607
 Average Recall     (AR) @[ IoU=0.50:0.95 | area= small | maxDets=100 ] = 0.363
 Average Recall     (AR) @[ IoU=0.50:0.95 | area=medium | maxDets=100 ] = 0.641
 Average Recall     (AR) @[ IoU=0.50:0.95 | area= large | maxDets=100 ] = 0.791
推理过程
推理前需参照 MindSpore C++推理部署指南 进行环境变量设置。
用途
在推理之前需要在昇腾910环境上完成模型的导出。
python export.py
# Ascend310 inference
sh run_infer_310.sh [MINDIR_PATH] [DATA_PATH] [DEVICE_ID]
运行方式
在run_infer_310.sh中设置了310的环境变量。
bash run_infer_310.sh [MINDIR_PATH] [DATASET_NAME] [DATASET_PATH] [DEVICE_ID]
示例
bash run_infer_310.sh sabl.mindir /Sabl_Test/val2017 0
运行结果
推理的结果保存在当前目录下,在cal.log日志文件中可以找到类似以下的结果。
 Average Precision  (AP) @[ IoU=0.50:0.95 | area=   all | maxDets=100 ] = 0.433
 Average Precision  (AP) @[ IoU=0.50      | area=   all | maxDets=100 ] = 0.599
 Average Precision  (AP) @[ IoU=0.75      | area=   all | maxDets=100 ] = 0.469
 Average Precision  (AP) @[ IoU=0.50:0.95 | area= small | maxDets=100 ] = 0.211
 Average Precision  (AP) @[ IoU=0.50:0.95 | area=medium | maxDets=100 ] = 0.452
 Average Precision  (AP) @[ IoU=0.50:0.95 | area= large | maxDets=100 ] = 0.599
 Average Recall     (AR) @[ IoU=0.50:0.95 | area=   all | maxDets=  1 ] = 0.375
 Average Recall     (AR) @[ IoU=0.50:0.95 | area=   all | maxDets= 10 ] = 0.581
 Average Recall     (AR) @[ IoU=0.50:0.95 | area=   all | maxDets=100 ] = 0.595
 Average Recall     (AR) @[ IoU=0.50:0.95 | area= small | maxDets=100 ] = 0.348
 Average Recall     (AR) @[ IoU=0.50:0.95 | area=medium | maxDets=100 ] = 0.629
 Average Recall     (AR) @[ IoU=0.50:0.95 | area= large | maxDets=100 ] = 0.779
随机情况的描述
在 train.py 脚本中设置了随机种子.
ModelZoo 主页
请核对官方 主页.
SABL的MindSpore实现
Python Text Shell C++
Contributors (1)