Are you sure you want to delete this task? Once this task is deleted, it cannot be recovered.
You can not select more than 25 topics
Topics must start with a chinese character,a letter or number, can include dashes ('-') and can be up to 35 characters long.
 kevinfu17
777f3e4993
kevinfu17
777f3e4993
|
1 year ago | |
|---|---|---|
| LICENSE | 1 year ago | |
| README.md | 1 year ago | |
README.md
桌上弹钢琴--基于JetsonNX的实时单阶段手指关键点识别
利用PaddlePaddle搭建CenterNet,并基于此魔改的手部5关键点模型,实时进行指尖关键点识别,使用pygame作ui互动及画面显示,以及钢琴声效的播放。只要一个摄像头+一个JetsonNX,就让我们实现钢琴自由,在任意桌面上弹奏.
A. 背景介绍
钢琴是人类创作音乐的乐器之王,程序是人类创造‘世界’的工具之魂。程序员往往被人认为不懂艺术,只懂数码世界的0与1。但这并不是全部,这里为程序员展现艺术细胞提供平台,让大家在任意平面上弹钢琴,让我们拥有弹奏自由,在任意平面上弹钢琴。这就是这个桌上钢琴师项目:
B. 正文
若想直接体验,则 下载本项目的Piano.zip压缩包 (下载地址:https://aistudio.baidu.com/aistudio/datasetdetail/181662 ) 到本地并解压,参照下文中: C.部署,D.运行 所述进行操作即可。(注:压缩包包含代码及模型文件)
B.1 需求描述
实现手指在任意桌面上想弹就弹,随时来一首练习曲。
B.2 需求细化
利用hand keypoints模型识别手关键点,获取指尖点在画面的x,y位置,当指尖关键点跨过虚拟钢琴键的黄色响应线,即播放该琴键的音
-
使用轻量化的单阶段关键点识别模型:因为使用轻便化硬件,如:JetsonNX,需在一定算力情况下,运行实时手指关键点识别,这里也简化为只识别5个指尖,不区分左右手(因为只要是指尖敲击都是响的)
-
用pygame作为主UI框架:实时显示摄像头的画面,画面中拍到的手指在桌面上敲击,用户敲击虚拟琴键(叠加在摄像头画面的UI)时,立即播放对应钢琴音
B.3 项目方案
-
使用摄像头获取桌面上手指的实时画面
-
手指关键点模型识别画面中手指指尖的x方向与y方向坐标
-
比较当前每个手指指尖的y方向坐标与校准时的y方向坐标,判定某个手指尖是否做了敲击动作
-
根据敲击动作的指尖的x方向坐标来判定具体按了哪个键。
-
通过pygame的UI显示按键效果,并播放对应的琴键音。
B.4 硬件准备
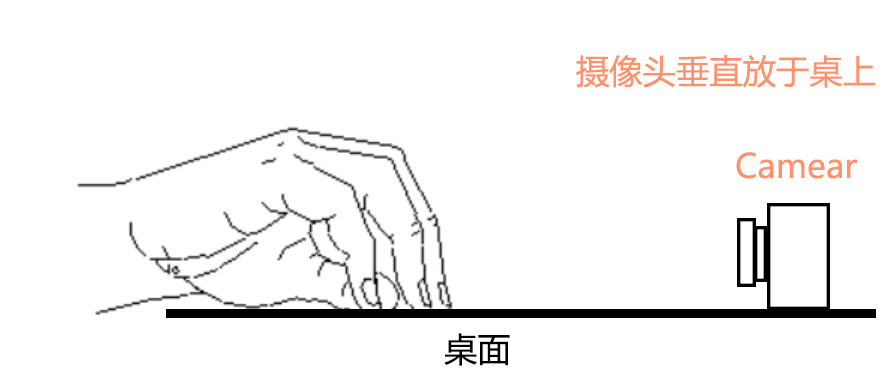
- 摄像头布置:
-
因这次使用的是2D hand keypoint模型,要实现弹钢琴的效果,通过识别手指在画面中y方向的位置来识别是否有敲击,x方向位置来识别敲击哪个琴键。摄像头垂直立于桌面上能最好拍摄到敲击桌面的情况,摄像头拍摄角度是水平的平行于桌面,点击位置可以通过初始化校准来自动调节(后面章节介绍)。这样能确保较好的交互性。
-
摄像头可选用普通usb网络摄像头。本项目选用无畸变摄像头,好处是无需处理畸变问题,缺点是画面拍摄的画幅不够大,无法对应回钢琴的88键。而选用大广角的摄像头会有畸变,但我们可以通过OpenCV的四角纠正校准成几乎无畸变的画面,但运算量会增大,响应延时会增大,有兴趣的筒子们也可以试试。
B.5 算法选型:
可使用3D hand keypoints 算法也可以使用2D hand keypoints算法。如果考虑摄像头空间位置及角度可考虑用3D keypoints算法,计算指尖三维空间位置,精度应该更高,受摄像头角度影响更小。但这里考虑算力问题,且我们可通过固定摄像头位置及角度如上图所示时,使2D keypoint算法也可以检测指尖是否敲击桌面,监测指尖关键点在图像y方向位置的变化。
基于2D hand keypoints的算法也有很多。Paddlehub上本身就已集成了openpose的手部姿态模型,在AIStudio上也有大佬放出了基于Restnet50直接回归手部关键点的项目。在尝试了后,感觉速度与精确度还有提升的空间,所以自己基于CenterNet魔改了一版手指关键点模型。下面对上述3个模型进行简单介绍:
1. Paddlehub中的hand_pose_localization模型:
其源自CMU的openpose开源项目https://github.com/CMU-Perceptual-Computing-Lab/openpose
,其实时多人肢体动作检测,让大众熟知了人体关键点检测,也惊艳于其人体关键点识别的效果。
但在此种角度下的拍摄识别手指关键点识别,效果比较一般。应该与训练的数据比较少这种情况有关。且缺点是无法在此Paddlehub模型上进行迁移训练。
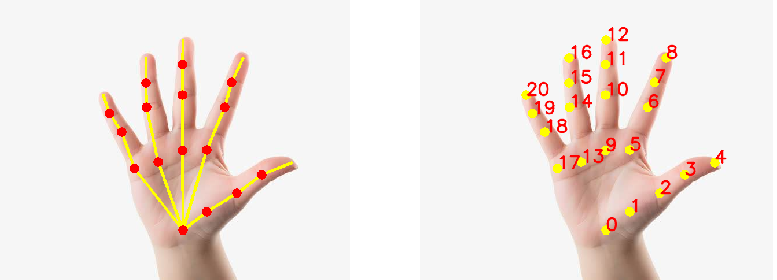
2. 飞桨实现手部21个关键点检测模型
该模型是大佬 星尘局 在aistudio上放出的模型。测试了一下,效果比openpose同样状态下好一些,且可以继续训练或进行迁移训练。但其是基于RestNet50上直接做回归,准确率及实时性在当前使用中还是不甚满意,需要再提升一下。
这里盗了一下“坑姐”的图
3. 基于CenterNet的手部关键点模型
- 3.1 基于CenterNet模型上魔改
-
基于上述2。中所述模型情况,自己魔改了一版CenterNet关键点模型。初始CenterNet的PaddlePaddle模型基于 唐齐言 大佬的《centernet-paddlepaddle2.0-昆虫识别》https://aistudio.baidu.com/aistudio/projectdetail/1957067?channel=0&channelType=0&sUid=56902&shared=1&ts=1672995777643 上进行修改。
-
为提升推理速度,实现实时交互,使用了MobileNetV3作为主干backbone,之后添加了基于heatmap识别landmrk的branch。
-
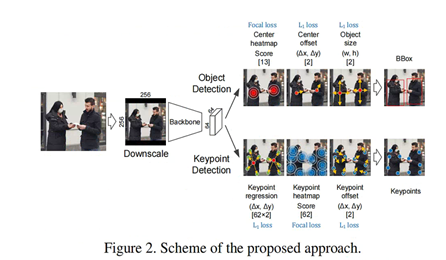
后面,回头看发现DeepFashion2 冠军方案也是基于CenterNet上添加keypoint识别,论文是《DeepMark++: Real-time Clothing Detection at the Edge》.2020。当然DeepFashion2任务还复杂一些。他们基于CenterNet还有一篇《DeepMark: One-Shot Clothing Detection》.2019。但代码并没有开源。运行在麒麟990上DeepMark++的DLA-34模型跑在MNN上,可以有14FPS.证明了单阶段的CenterNet在速度上的确有优势,若优化得好,准确率也能提上去。
-
本方案类似于DeepFashion2 的冠军方案[1],如下图所示,DeepFashion2 的方案基于CenterNet上添加了Keypoint识别。本方案与之类似,由于任务相对简单,并不需要求出bbox,因此删减了Object size的回归。
- 3.2 手部5个指尖关键点
为了更好地在边缘段部署,把原来手部单手21个关键点,简化为只是训练或推理,5个手指指尖点,缩减网络及一丢丢推理时间。
- 3.3 不区分左右手
因本项目使弹钢琴用,就并没有分左手或右手了。所以关键点处也没分左手与右手
- 3.4 TODO
因为直接用heatmap回归指引找手指关键点的方式,在找食指关键点时,会推理中指关键点是食指。这部分还在有化,暂时按识别关键点图像上x坐标点来排列。
因此这魔改版CenterNet handkeypoints觉得还在优化中,训练部分就先不放出来了
-
3.5 主要推理代码如下:
def detect_image(self, image, image_id=None, record=False):
  assert image is not None

  image_shape = np.array(np.shape(image)[0:2])
  self.drawInit(image)
  # ---------------------------------------------------------#
  #   给图像增加灰条,实现不失真的resize
  # ---------------------------------------------------------#
  crop_img ,image= self.boxed_image(image, [self.image_size[0], self.image_size[1]])

  # ----------------------------------------------------------------------------------#
  #   将RGB转化成BGR,这是因为原始的centernet_hourglass权值是使用BGR通道的图片训练的
  # ----------------------------------------------------------------------------------#
  photo = crop_img
  if record:
      (Image.fromarray(np.array(crop_img,'uint8'))).save('input.jpg')
      # -----------------------------------------------------------#
  #   图片预处理,归一化。获得的photo的shape为[1, 512, 512, 3]
  # -----------------------------------------------------------#
  photo = np.reshape(np.transpose(preprocess_image(photo), (2, 0, 1)),
                     [1, self.image_size[2], self.image_size[0], self.image_size[1]])

  with paddle.no_grad():
      images = paddle.to_tensor(np.asarray(photo), dtype='float32')

      outputs = self.centernet(images)

      # -----------------------------------------------------------#
      #   利用预测结果进行解码
      # -----------------------------------------------------------#
      # print(outputs)
      outputs,trackHM = decode_bbox(outputs, self.image_size, self.confidence,landmarkNums=self.landmarkNum)
      try:
          if self.nms:
              #print('do nms')
              outputs = np.array(nms(outputs, self.nms_threhold,self.landmarkNum))
      except:
          pass

      output = outputs[0]
      # print(output.shape)
      if len(output) <= 0:
          return image,[]

      batch_center,batch_landmarks, det_conf, det_label \
          = output[:, :2],  output[:, 2:-2], output[:, -2], output[:, -1]
      # det_xmin, det_ymin, det_xmax, det_ymax = batch_boxes[:, 0], batch_boxes[:, 1], batch_boxes[:,
      #                                                                                2], batch_boxes[:, 3]
      print('det_conf',det_conf)
      batch_matchLandmarks=pointMatchHeatmap(batch_center, batch_landmarks, trackHM, trackHM.shape,self.landmarkNum)
      # -----------------------------------------------------------#
      #   筛选出其中得分高于confidence的框
      # -----------------------------------------------------------#
      # output_shape=np.array(trackHM.shape)
      top_indices = [i for i, conf in enumerate(det_conf) if conf >= self.confidence]
      top_conf = det_conf[top_indices]
      top_label_indices = det_label[top_indices].tolist()
      batch_bias=batch_matchLandmarks.reshape((-1,self.landmarkNum,2))-np.expand_dims(batch_center,1)
      # batch_bias=batch_bias.reshape((-1,self.landmarkNum*2))
      batch_xRadius=np.max(np.abs(batch_bias[:, :, 0]), 1)
      batch_yRadius=np.max(np.abs(batch_bias[:, :, 1]), 1)
      det_xmax,det_xmin=(batch_center)[:,0]+batch_xRadius,batch_center[:,0]-batch_xRadius
      det_ymax,det_ymin=(batch_center)[:,1]+batch_yRadius,batch_center[:,1]-batch_yRadius

      det_xmax,det_xmin=np.clip(det_xmax,0,output.shape[1]-1),np.clip(det_xmin,0,output.shape[1]-1)
      det_ymax,det_ymin=np.clip(det_ymax,0,output.shape[1]-1),np.clip(det_ymin,0,output.shape[1]-1)
      #
      top_xmin, top_ymin, top_xmax, top_ymax = np.expand_dims(det_xmin[top_indices], -1), np.expand_dims(
          det_ymin[top_indices], -1), np.expand_dims(det_xmax[top_indices], -1), np.expand_dims(
          det_ymax[top_indices], -1)
      # -----------------------------------------------------------#
      #   去掉灰条部分
      # -----------------------------------------------------------#
      boxes = centernet_correct_boxes(top_ymin, top_xmin, top_ymax, top_xmax,
                                      np.array([self.image_size[0], self.image_size[1]]), image_shape)

      centers=correct_lanmarks(batch_center, np.array([self.image_size[0], self.image_size[1]]), image_shape)

      landmarks=correct_lanmarks(batch_matchLandmarks.reshape((batch_center.shape[0],-1)), np.array([self.image_size[0], self.image_size[1]]), image_shape)

  # 绘制检测结果至原图        ##


  if record:
      if not os.path.exists("work/test_results/"):
          os.makedirs("work/test_results/")

  for i, c in enumerate(top_label_indices):
      predicted_class = self.class_names[int(c)]
      score = top_conf[i]
      label = '{} {:.2f}'.format(predicted_class, score)
      color=self.colors[int(c)]
      if self.debugDrawFlag:
          image=self.debugDraw(image,boxes[i],landmarks[i],centers[i],label,color)

  ## sort by x of center,right hand first,
  sortIndex=(np.argsort(centers[:,0]))[::-1]

  return image,landmarks[sortIndex]
B.5 训练数据:
- 我自己找到的训练数据集来自于Eric.Lee的:https://gitcode.net/EricLee/handpose_x 项目。作者制作的handpose_datasets_v1数据集。其handpose_datasets_v2一直没找到。
后面幸好找到 "坑姐" 公开的handpose_datasets_v2数据集(当然也是源自Eric.Lee),在兼容handpose_datasets_v1的基础上,增加了左右手属性"handType": "Left" or "Right"。handpose_datasets_v2数据总量为 38w+。https://aistudio.baidu.com/aistudio/datasetdetail/162171/0
注:handpose_datasets_v1数据集包括网络图片及数据集<<Large-scale Multiview 3D Hand Pose Dataset>>筛选动作重复度低的部分图片,进行制作(如有侵权请联系删除),共49062个样本。 <<Large-scale Multiview 3D Hand Pose Dataset>>数据集,其官网地址 http://www.rovit.ua.es/dataset/mhpdataset/ 感谢《Large-scale Multiview 3D Hand Pose Dataset》数据集贡献者:Francisco Gomez-Donoso, Sergio Orts-Escolano, and Miguel Cazorla. "Large-scale Multiview 3D Hand Pose Dataset". ArXiv e-prints 1707.03742, July 2017.
B.6 程序运行流程
程序整体使用生产者消费者模式,分为三个模块:输入模块、手部关键点预测模块、主显示及UI处理按键响应模块。输入模块放在子进程是生产者,输入的图片加入到可跨进程读写的queue中,给到主进程的消费者,消费者包含关键点预测模块,预测手指关键点结果与画面及UI进行叠加,通过pygame来显示。采用多进程处理,输入图片是一个进程,模型推理与UI响应是一个进程,能更高效运行避免出现卡顿。
1. 输入模块(生产者):
ModuleInput.py。使用openCV的cv2.videoCapture读取视频流或摄像头画面或视频。获得的画面放入dataQueue中等待处理
代码如下,获得的画面frame,添加到dataDeque中。为节省篇幅这里不放代码了,可到 ModuleInput.py 中查看。
2. 手部关键点预测模块(消费者):
把使用pygame作为呈现端,摄像头画面、叠加的UI或提示、按键响应均通过pygame实现。pygame还能实现基于openGL的一些操作,但在这里用不到。
3. 主UI模块:
3.1 使用pygame作为UI呈现端
使用pygame作为UI框架另一原因是pygame播放声音更灵活,可同时播放多个声音,暂时除pygame外无法找到其他可用的库
摄像头画面、叠加的UI、按键响应/声音播放均通过pygame实现。pygame还能实现基于openGL的一些操作,但在这里用不到。
下面放出主要代码:
import pygame
from pygame.locals import *
from sys import exit
import sys
pathDict={}
pathDict['hand']='../HandKeypoints/'
for path in pathDict.values():
    sys.path.append(path)
import cv2
import time
from collections import deque
from PIL import Image
import traceback
from multiprocessing import Queue,Process
from ModuleSound import effectDict
# from ModuleHand import handKeypoints
import CVTools as CVT
import GameTools as GT
from ModuleConsumer import FrameConsumer

from predict7 import CenterNet
from ModuleInput import  FrameProducer
import numpy as np
pygame.init()

def loopRun(dataQueue,wSize,hSize,prodecer,consumer,thresholdY,movieDict,skipFrame):
    # tip position of hand down
    ftDown1={}
    ftDown2={}
    # tip position for now
    ft1={}
    ft2={}
    # tip position of hand up
    ftUp1={}
    ftUp2={}
    #
    stageR=-1
    stageL=-1
    resXR=-1
    resXL=-1
    idsR=-1
    idsL=-1
    #
    biasDict1={}
    biasDict2={}
    screen = pygame.display.set_mode((wSize,hSize))
    # cap = cv2.VideoCapture(path)
    num=-1
    keyNums=12
    biasy=20
    result={}
    while True:
        ##

        FPS=prodecer.fps/skipFrame
        if FPS > 0:
            videoFlag = True
        else:
            videoFlag = False
            ##

            ##
        # print('ppp', len(dataDeque), len(result))
        if  dataQueue.qsize()==0 :
            time.sleep(0.1)
            continue
        # print('FPS',FPS)


        elif dataQueue.qsize()>0:
        ##
            image=dataQueue.get()
            ## flir left right:
            image=image[:,::-1,:]
            result=consumer.process(image,thresholdY)
            resImage=result['image']
            ftR=result['fringerTip1']
            ftL=result['fringerTip2']
            #print('resImage',resImage.size)

        thresholdY=keyboardResponse(prodecer, ftR,thresholdY)

        if videoFlag:

            num += 1
            if num == 0:
                T0 = time.time()
                print('T0',T0,num*(1./FPS))
        # ui叠加
        try:
            resImage = GT.uiProcess(resImage,ftR,ftL,biasy)

        except Exception as e:
            traceback.print_exc()
        # 手指点击判定
        try:
            fringerR,keyIndexR,stageR=GT.pressDetect(ftR,stageR,thresholdY,biasy,wSize,keyNums)
            fringerL,keyIndexL,stageL=GT.pressDetect(ftL,stageL,thresholdY,biasy,wSize,keyNums)

            #print('resR',idsR,resR,idsL,resL)
        except Exception as e:
            traceback.print_exc()
        #

        GT.soundPlay(effectDict,keyIndexR)
        GT.soundPlay(effectDict,keyIndexL)
        #
        resImage=GT.moviePlay(movieDict,keyIndexR,resImage,thresholdY)
        resImage=GT.moviePlay(movieDict,keyIndexL,resImage,thresholdY)

        frameShow(resImage, screen)
        #clear result
        result={}


if __name__=='__main__':
    link='./testSource/hand6.mp4'
    link=0
    wSize=640
    hSize=480

    skipFrmae=2

    dataQueue = Queue(maxsize=2)
    resultDeque = Queue()
    thresholdY=250
    producer = FrameProducer(dataQueue, link)
    ##
    frontPIL=Image.open('pianoPic/pianobg.png')
    handkeypoint=CenterNet(folderPath='/home/sig/sig_dir/program/HandKeypoints/')
    consumer=FrameConsumer(dataQueue,resultDeque,handkeypoint,frontPIL)
    producer.start()
    #
    moviePicPath='pianoPic/'
    movieDict=GT.loadMovieDict(moviePicPath)
    #
    loopRun(dataQueue, wSize, hSize, producer,consumer,thresholdY,movieDict,skipFrmae)
C. 部署
0. 下载代码模型
下载本项目的Piano.zip压缩包 https://aistudio.baidu.com/aistudio/datasetdetail/181662 到本地并解压
具体根据不同情况选择对应的开始部署。
1. X86 / X64 系统上运行
- 1.安装PaddlePaddle及pygame等所需的库
- 2.解压Piano.zip到目录中
- 3.进入 HandPiano 文件夹,python main.py运行程序即可
2. 在Arm设备,如JetsonNX上运行
-
- 从0开始
如果从0开始部署PaddlePaddle到Jetson NX可参考“ゞ灰酱”大大的项目: https://aistudio.baidu.com/aistudio/projectdetail/969585?channelType=0&channel=0
-
- 已装有系统
可到官网下载 paddle inference库。
https://www.paddlepaddle.org.cn/inference/v2.4/guides/install/download_lib.html
-
- 安装对应的库
-
- 解压Piano.zip到目录中
-
- 进入 HandPiano 文件夹,python main.py运行程序即可
D. 运行
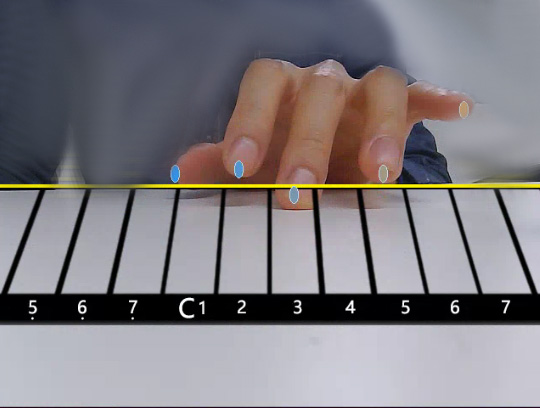
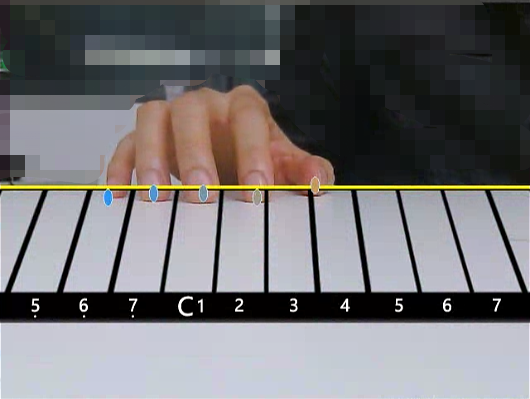
按硬件配置设置好,按C部署弄好后,启动程序会看到如下UI。
-
- 一只手的五指放于桌面上,当5个手指点的圆形都出现后,击鼠标左键进行“点击位置校准”
-
- “点击位置校准”后,会调整琴键UI位置,黄线会在指尖所成的直线处
-
- 当指尖的点越过黄线进入琴键位置后即触发该琴键的声音
-
- 标示有C1的就表示C大调的do,之后的2,3,4,5,6,7 就是对应C大调的简谱的 2(rui),3(mi), 4(fa), 5(sou), 6(la), 7(si)。 C1左边的是降一个调的简谱的5,6,7
-
- Let`s begin to play the song!
利用PaddlePaddle搭建CenterNet,并基于此魔改的手部5关键点模型,实时进行指尖关键点识别,使用pygame作ui互动及画面显示,以及钢琴声效的播放。只要一个摄像头+一个JetsonNX,就让我们实现钢琴自由,在任意桌面上弹奏.
other
Apache-2.0
Contributors (1)